

In the past few years, I'd finally started migrating to cordless tools. It started with helping a niece fix a car (the water pump housing bolt snapped, requiring a narrow drill, so I went with a Harbor Freight 3/8" Right Angle Drill do that I didn't have to remove the bumper to drill it out). Next, a few months ago, my angle grinder finally gave up the ghost (another Harbor Freight special that lasted for 13 years), and that resulted in me seeing a battery-powered angle grinder. Be wary, it will drain the battery really fast, so be prepared to have a few batteries on hand when you need it). Since I was already part way into the Harbor Freight "Bauer" line, I just picked up a hammer drill, a regular drill, an impact wrench, and one of those detail sanders (I needed to sand into a corner for a repair). I had piles of tools sitting around the garage, with no organization. The tools were always getting under foot, in the way, and I needed to organize it all. That forced my hand.
I ran to home depot and bought a 10' length of 4" schedule 40 PVC pipe. I cut off a few lengths, and then ran them through the table saw for slits (do NOT run them all the way through - the pipe is under tension and will clamp down on the table saw blade as soon as you break through, and you really don't need the slot all the way through the length of the pipe). I measured for the handle widths on the pipe and put an identical slot far enough away to clear the handle (but not the body of the tools). Unfortunately, I ended up all the way through on a few of these, so I ended up cementing a piece of pipe ring around the PVC so that one end was secured.

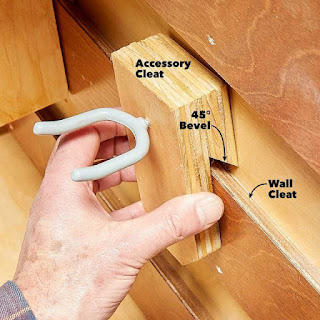
While I was at it, I created a French Cleat system using two 2"x4" boards attached vertically to some studs for stability. Then I ran two 10" boards through the table saw at a 45 degree angle, and attached those horizontally (using a level) with the sharp corner at the top and away from the 2"x4" boards. That gives a locking "lug" that can be attached to the back of a shelf. (The picture was shamelessly stolen from https://www.familyhandyman.com/project/how-to-build-a-french-cleat-tool-storage-wall/ if you want to know, and the picture links over there, too.)
Next was just building a shelf and adding the PVC pipes to it, then put it in place. The shelf doesn't need to be attached to the horizontal boards with screws - gravity will keep them in place as the accessory cleat is pulled down to the wall cleat.

That's it. Battery tools have been organized, and I have a recharging station, plus I can add shelves or move them as I need to. Yes, that is another cleat accessory to hold some cleaning and some of my wife's craft spray cans. I have another accessory to add (just a simple shelf) to hold a few more things, but I'm happy to have some floor space back, and a central location for the wood working tools.


