Tuesday, December 28, 2021

Old Keyless Chuck

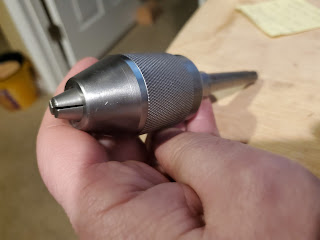
 I found an old, keyless chuck on eBay that I was willing to buy.  It was priced almost right (for $25, it should have at least worked).  It's a Craftsman keyless chuck from 1972, model 22562 (stamped into the back).  it's an integral shank Morse taper (MT1), and when threading on or off, the jaws didn't move.  I thought I'd better take it apart and see what the trouble was, since I'm better at taking things apart than I am at putting them back together.

Anyway, before I got it apart, I noticed that some pieces were not lined up when looking through the middle of it.  If I pulled the threaded part of the shank out, I could see light through it with a flashlight behind the chuck.  I knew it absolutely HAD to come apart.

Some chucks split between the knurled surface on the body and the cone at the top. This one splits between the knurled section and the base (right at the parting line).  I had to use some locking wrenches to get it apart.  This part took me a while to figure out, since it didn't go the same way as other chucks described out there.  Once the body came apart, the whole thing came apart fairly quickly.

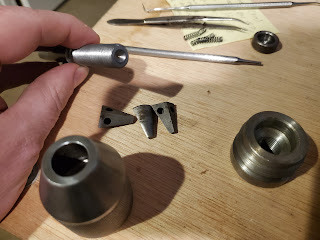
It was at this time that I noticed two divots - one in the threaded rod end (between my fingers in the above photo), and one in the piece that was out of place before I got to this point (the round thing in the top-right of the picture - the tweezers are pointing to this part).  If this was turned between centers, the slopes on these two divots would be different - they were about a 120-degree cone.  It didn't take a genius to realize that I was probably missing a ball bearing.  I went out to my stash, and grabbed one that would set in place and allow the two pieces to spin freely of each other.

Then I cleaned it.  It felt really tacky to me.  A good cleaning, and then I could piece it back together.

The re-assembly went rather quickly, and now I have an old Craftsman keyless drill chuck (circa 1972), MT1, to go with my Craftsman (well, Dunlap) wood lathe (circa 1942).


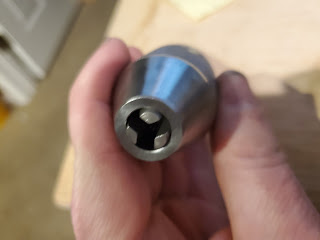
Looks good, has a slight hang up on retracting a chuck jaw, but it does function.  I might need to lightly oil the chuck body (NOT the jaws) to make sure it's good, but I'm happy.

Thursday, December 2, 2021

A Barrel For Monkeys

 A buddy of mine had a job for me.  He handed me a Glock 27 (.40 S&W), and asked me to replace some parts that have worn, and also give it a face lift.  After taking it apart, I sandblasted the slide, and purchased a second slide.  I did not want to make massive changes to his gun, so it was a bit of a challenge to find a slide that didn't have awkward cuts for red-dots or other things used in competition.  With that one in hand, I also sandblasted that one in preparation for Cerakote.

The difficult part here is that the frame is a slightly-greenish form of brown.  The Cerakote colors I had on hand were black, burnt bronze, and eastern front green.  Having worked as an artist for a year, and having taken a number of art classes, I took a chance on coloring.  I used 1/2 (30ml) volume of black, 25ml of burnt bronze, and 5ml of the forest green.  Mixing it up was fast, a quick spray, and into my toaster oven to cure for a couple of hours.


The color came out nearly perfect.  I can see a very slight difference in color, but it looks like an exact match.  The colored frame and the black slide of the former version pales in comparison, really.  Anyway, I had to purchase a striker channel liner removal tool, and that also functioned as an installer.

His barrel replacement was one of the bigger issues.  That was extremely painful to locate a replacement.  I finally found a longer barrel (about 0.8875" longer) with a built-in series of vent tubes (muzzle-brake of sorts) that was destined for competition.  Considering the guy uses this for a carry gun, I had to shorten the barrel.


Yeah, it definitely needs to be shortened.

I started putting the barrel into the 4-jaw chuck, but I struggled on concentricity.  It was about the third try at it when I realized that I did not trust it.  I could not indicate on the outside - because I don't know how concentric it was to the actual inside.

Based on that, I had to build a new "setup" tool.  I grabbed a piece of stainless steel about 20" long, 9/16" diameter, and faced the end and center-drilled it (I also put a concentric end on it so I could double check diameters over the full length.  I pulled it out to where the other end was barely held by the collet, with the far end held via the live center at the tailstock.

Then I could turn a 3" length down to 0.391" (the gauge pin gave me this diameter specific for these barrels, and again, I bought two in case I hosed it up).  I put a bit of a relief cut on the end so that I didn't have a rounded area locking onto the barrel, and then, slightly away from the barrel and while still held in place by the collet, I turned a small, shallow groove that I could use as an indicator spot.  I had to do a test fit with the barrel.


The next phase was to re-install the first barrel into the 4-jaw chuck with the centering rod in place to keep it concentric.


Once centered up, I could begin the cut, face the barrel, and then put a crown on it.  Here is the gun with the cut-off barrel section, ready to be delivered!

This was my first, and likely my only barrel job.  I didn't like doing this too much, and have no need to do anything like this for myself.  But, I can convert that long shaft into a new dead center for the headstock, so it's not a total loss for me.