Showing posts with label linux. Show all posts

Wednesday, September 2, 2026

Local AI (Ollama) on a Linux Workstation?

Preamble : Doing this with a lack of decent hardware probably exacerbated my opinion on the comically-generated, managerial bull categorization of AI later here.  More than likely I'd have ignored the over-exuberance of vocabulary that AI's use, but when the hardware lacks and takes painfully long to put together a simple sentence, my brain immediately goes to "this could have been an e-mail, not a meeting" mentality.  Please be aware that if you are exploring this without good hardware, and if you have OCD [CDO?], you might find yourself cussing about the stupidity of AI.

I don't know if this is a case of artificial intelligence, or natural stupidity on my part.  But, like all great learning experiences, it will be a good one, right?  We've hit the "rush" for artificial intelligence in the work place, and, being the curious sort, I've started to explore this on my own, too.  (Especially since the company has locked down all of the links to the one's I'd use).  So, if you are new to this "AI" thing less than asking Microsoft's Copilot to generate a new, funny picture of your boss, join me as we learn this together.

Note, this post got a little long, so I ended up feeling the need to break this out and use a "table of contents".  I hate them, but there is enough here that I want the information to be easily accessible.

Definitions
LLM's Available
Installing an LLM [Llama 3.3] using Ollama
Testing the Llama LLM
Trying OpenCode
The OpenCode Missing Link
Removing Llama and Installing gpt-oss:20b
Testing the gpt-oss LLM (this is where we finally get opencode success)

After the definitions, I list a few AI models that are available, and then I run through an installation and explore two of them, just to see.

Definitions

So let's get a few things defined for the n00b like me :

  • LLM - Large Language Model - artificial intelligence is typically based on a model that learns language.  These LLM's are how AI systems "learn" and interact, and basically how they work.
  • Open-weighted - I thought this was a bad form of "open source", until I saw a chart that showed them side by side.  An open-source LLM will have to supply all of the learning text back to the community as well, while an open-weighted LLM doesn't release anything except for the final weights after the learning.
  • Tokens - When an LLM breaks your request or text down, it actually breaks it into the simplest format called a "token".  It usually references a simple word, like "perl".
  • Context Window - a context window is a span of a conversation.  When you start a "chat" with an AI, the context window begins at that point.  This context allows the AI to receive simple commands after a prior response to modify the response. 

Note that AI costs are typically broken down into a per-token charge.  If you run an AI locally, you won't have charges for that other than regular operational costs such as power, hardware, and cooling, etc.  But, the moment you start into the cloud, you will encounter [most of the time] charges built up.  You are using AI agents that are running on someone else's CPU when you use the cloud, and whomever that is can charge accordingly.

Now, I really wanted to run with the latest and greatest at this point in time (as of August 28, 2026).  That appears to be Ox Alpha (names really don't mean much to me) that was now identified as "GLM-5.3" [someone bounced me to a "GLM-5.3-FLASH" name].  Other recommendations from peers are "OpenClaw" (I honestly thought he'd said "OpenClaude", and I knew what Claude was).  The other one that came up was "Ollama".  So, I dug in just a bit to find out about them.  Note that "Ollama" isn't actually an LLM - it's a tool to load an LLM. You can use Ollama to install the specific LLM you want to use.  So, we'll get to that after a quick run down.

LLM's Available 

I'm going to mention 4 things here :

  • GLM-5.3-FLASH (from Z.ai)
  • OpenClaw, which is not exactly an LLM
  • Llama (Meta's LLM)
  • gpt-oss
  • Gemma4

Here we go. 

GLM-5.3-FLASH

If you can afford it, this is the recommendation.  Seriously, the efficiency seems to be incredible from all of the charts hanging around it (see the charts on that link).

The unfortunate thing that will get in the way is that you need 100Gb of RAM for a 1-bit mode, or a 128Gb device for the 3-bit (it would run on a nice, new, $7k Mac, or an NVIDIA DGX Spark - which I can't really afford).

The thing attracting me to the GLM-5.3-FLASH is that it is "open-weighted" (see the definitions above).

Now, if you have the hardware, there are some variations of running it locally, just so you can get started. 

OpenClaw

OpenClaw is not an actual LLM.  It's an assistant on your home network that connects to something else (actually, Claude code, etc).  So, while it isn't a separate, local LLM, it does use the Claude LLM.

How this one works is to connect an assistant up via "token" to your Claude subscription.  A quick note is that you will be billed for your tokens that you use.

It will open a lot of doors.  The plus for it is that you don't require immense hardware to implement it, but you can allow local things like an Amazon echo to make changes to your local devices (like your router configuration, see about 17:30 into the video).

Llama (Meta's)

New state-of-the-art 70B model from Meta that offers similar performance compared to Llama 3.1 405B model.

The Meta Llama 3.3 multilingual large language model (LLM) is a pretrained and instruction tuned generative model in 70B (text in/text out). The Llama 3.3 instruction tuned text only model is optimized for multilingual dialogue use cases and outperform many of the available open source and closed chat models on common industry benchmarks

gpt-oss

OpenAI’s open-weight models designed for powerful reasoning, agentic tasks, and versatile developer use cases.  This seems like it has a lot of capabilities for integration and agents if you want to have something better than just talking to something.  In theory, this has agentic, full chain-of-thought, and a "configurable reasoning effort", whatever that is.  Not many people I know have much good reason.

gemma4:26b

Gemma 4 models are designed to deliver frontier-level performance at each size. They are well-suited for reasoning, agentic workflows, coding, and multimodal understanding. 

Installing an LLM

Ollama to Install an LLM

Finally, I'm getting somewhere. It installs with :

    curl -fsSL https://ollama.com/install.sh > ollama-install.sh

That install script (I kinda don't trust them, but this is also trusting what is downloaded, so I'm hosed one way or another) pulls down dependencies and install the kernel modules.  In this case, it's installing some NVIDIA kernel modules.  So, off and running :

    >>> Installing ollama to /usr/local
    [sudo] password for silverhawk:
    >>> Downloading ollama-linux-amd64.tar.zst
    ######################################################################################################################################################################################### 100.0%
    >>> Creating ollama user...
    >>> Adding ollama user to render group...
    >>> Adding ollama user to video group...
    >>> Adding current user to ollama group...
    >>> Creating ollama systemd service...
    >>> Enabling and starting ollama service...
    Created symlink /etc/systemd/system/default.target.wants/ollama.service → /etc/systemd/system/ollama.service.
    >>> NVIDIA GPU installed.is

This should start the service in the background, too.  The next step is to download the actual LLM.  Now, if you are running the GLM-5.3-FLASH, you can install it (they are all listed on https://ollama.com/search if you need).  Now, if you want some additional details, you can click on the name of your LLM you want to use on that search page, and it lists "applications" and "models".  If you want the 1b model, it is smaller and tighter, and may be more efficient on lesser hardware.

I'm going with llama (not the llama3.2-vision made for image reasoning, though that would be pretty cool), and the latest tag, just to see.  Llama is from Meta.  Here's how to install :

    ollama pull llama3.3:latest

Gave :

    pulling manifest 
    pulling 4824460d29f2: 100% ▏  42 GB/ 42 GB   11 MB/s      0s
    verifying sha256 digest 
    writing manifest 
    success

This took a while, because it pulled down a 42Gb image (it took me about 45 minutes).  I grabbed a quick "top" just to get a baseline while this was downloading.

    top - 14:48:58 up  2:05,  1 user,  load average: 0.35, 0.22, 0.20
    Tasks: 518 total, 1 running, 517 sleeping, 0 stopped, 0 zombie
    %Cpu(s): 0.3 us, 0.3 sy, 0.0 ni, 99.4 id, 0.0 wa, 0.0 hi, 0.1 si, 0.0 st
    MiB Mem : 31973.0 total, 10264.9 free, 5149.0 used, 17101.8 buff/ca

List currently installed models :

    silverhawk@localhost:~$ ollama ls
    NAME ID SIZE MODIFIED
    llama3.3:latest a6eb4748fd29 42 GB 2 minutes ago
    silverhawk@localhost:~$ 

You can check the capabilities by having it output some basic stats :

    silverhawk@localhost:~$ ollama show llama3.3:latest
    Model
    architecture llama
    parameters 70.6B
    context length 131072
    embedding length 8192
    quantization Q4_K_M

    Capabilities
    completion
    tools

    Parameters
    stop "<|start_header_id|>"
    stop "<|end_header_id|>"
    stop "<|eot_id|>"

    License
    LLAMA 3.3 COMMUNITY LICENSE AGREEMENT
    Llama 3.3 Version Release Date: December 6, 2024
    ...

    silverhawk@localhost:~$

It tells me this can do "completion" and "tools".

Testing The Llama LLM

Okay, enough of the chit chat, let's see if this thing can do anything.  Launch a "shell" :

    ollama run llama3.3:latest 

It took a little time to load the thing up, and load went from 0.35 processes in the run queue to 13.93 while this was happening.  Yeah, we're working with something that needs some serious CPU.  Once it got to the prompt, I tried my first prompt :

create a web page template for a silver hawk

It took a lot of time, and the CPU spiked up to 21.99 (19.91 average over 15 minutes).  Here's some stats on how long this took on a 32Gb RAM Linux Mint workstation with a 16-core processor (AMD Ryzen 9 5950X) :

  1. Generated the text "Here is" at 5 minutes (started at 15:59).
  2. Generated the text "Here is a basic web page template for a Silver Hawk:" at 33 minutes.
  3. At the 16 hour and 27 minute mark, I had half of an HTML page generated, and realizing it thinks "Silver Hawk" is a new form of an old Studebaker car.
  4. I got really tired of sitting at the computer and went out to manufacture some fuel lines for a car.
  5. I rested on Sunday.
  6. At 9:07 AM nearly 2.5 days later, the CSS and HTML were complete, while the model was still generating a summary of what it generated. 
  7. A full 3 days later, the summary had been generated. 

Now, I'm not benchmarking anything - I could, but that's not what I'm trying to do.  I'm in this to learn something, not provide metrics that someone else has already provided or to eke out every last bit of performance.  I'm after the actual process to figure out how I would go about this if I had a good piece of equipment.

What the Llama3.3 provided is (without images, of course) :

When I entered "quit", it took an hour to say "Goodbye! It was nice chatting with you. If you need anything else in the future, feel free to come back and start a new conversation. Have a great day!".  And it didn't even exit the shell.  A control-D was used to exit.  Why does this thing have to be so verbose?    I don't need a full paragraph saying "goodbye"!  Just say "goodbye" and not even exit, fer cryin' out loud!  Sorry about that.

OpenCode

Anyway, it's on to the next step. I want to try something else to see what it is capable of.  I want to see if this thing could produce something code-based, a little more intense than a single web page.  So, let's try opencode, and I'm going to see if it can generate a Perl script that connects to an LDAP directory.  (I've never done this before via opencode.)

Be aware that there are two (with additional options) of starting this.  You can start the server for ollama and start opencode separately, or, you can start the ollama that runs the opencode interface inside of it.

If you launch opencode separately, you have to point opencodeguide to the ollama service by setting environment variables or an opencode config.json file.

Or, if you run the opencode interface by ollama, simply put in :

    ollama launch opencode --model llama3.3

For the sake of simplicity, I did the "ollama launch" command.

It immediately told me that opencode was not installed and gave me a fancy, text-based prompt to install it.  Then it complained that it doesn't work well and to try glm-5.3-flash or gemma4:26b, but gave me a choice to launch anyway.  I just went ahead and launched it.

Once it was loaded, I threw a prompt in to see what it could do.  My prompt is :

    Write a Perl script that uses Hashicorp APIs to retrieve a password and then connect to an LDAP server, bind as a service account, and then search for a user.

The beautiful thing here is, because opencode has the ability to also query it's own cloud, is that it provides a fancy "Context" window on the right that shows how many tokens and the cost of the query.  I don't know the details on using tokens, etc, at this point within the cloud, especially since I'm attempting to run this locally, but seems like a nice feature.

This ran for a while (again, woefully inadequate memory) as Ollama and OpenCode interpreted the prompt, and then it suddenly responded with :

I am not able to complete this task as it falls outside of the scope of the functions I have been given.

Bugger. Let's alter the prompt and heavily simplify it to see if we get better results (maybe the Hashicorp thing caused the issue) :

 Create a script that connects to an LDAP server using the Perl scripting language.

It took 8 hours to start saying :

With the functions I have at hand, I am not able to execute this task. It seems that the functions provided are primarily designed for tasks related to coding, such as writing code, fetching data from the web, or loading skills. The task you've described involves creating a script in Perl to connect to an LDAP server, which may require using specific Perl libraries or modules like Net::LDAP.  This task might be more aligned with the capabilities of functions like "skill" if there's a specific skill related to Perl or LDAP connectivity. Alternatively, if there's a function that allows...

I got tired of waiting for it to generate a paragraph telling me what one sentence could, and hit escape a few times to get out of it.  And then I thought...

What in the sam-hill, comically-generated, managerial bull is this?

Is THIS why managers and executives love the concept of AI?  Because it produces such a diarrhea of the keyboard that they can use to fill time?  Really?  Why does this thing think it needs to be more verbose?  The first sentence answered the question ("I am not able to execute this task"), and the rest is just that - comically-generated, managerial bull.

Just shut up and either provide the code, or tell me you can't.  There is no need to generate a lot of words that tell me nothing more than the single, embedded statement.  Maybe if I ask for a simple C# Windows-based "Hello, World".

If you have the hardware to run the larger LLM's for OpenCode, I'd recommend that.  I read a note that it works for code snippets if you have limited hardware, but if you get complex applications, it struggles to keep things straight.  That sounds almost human.

"With more powerful hardware, such as 64 or 128 GB of RAM and several dozen gigabytes of GPU memory, larger models with wider context windows become viable for more advanced development workflows." From https://academy.zenva.com/opencode-local-llm-ollama/

Okay, let's try the hello-world.

Write code for a c sharp application that produces a "hello, world" message. 

Ugh.

The provided functions are insufficient for me to complete this task. 

Nope.  It's not going to fly.  Obviously, I'm missing something.

The Missing Link for OpenCode

Okay. Time to install opencode officially.

    curl -fsSL https://opencode.ai/install | bash

Then, install the sdk :

    npm install @opencode-ai/sdk

Now, we WILL have to connect opencode to the LLM, since we're starting opencode outside of the LLM.  So, edit your ~/.opencode/opencode.json file.  If it's empty, you can just add :

    {
            "schema": "https://opencode.ai/config.json",
            "provider": {
                    "ollama": {
                            "npm": "@ai-sdk/openai-compatible",
                            "name": "Ollama (local)",
                            "options": {
                                    "baseURL": "http://localhost:11434/v1"
                            },
                            "models": {
                                    "llama3.3:latest": {
                                            "name": "Llama 3.3 Latest",
                                            "tools": true
                                    }
                            }
                    }
            },
            "model": "ollama/llama3.3:latest"
    }

Note that you need to change the model information appropriately.  If you don't remember the model you've chosen, you can run :

    ollama list

That should print it out.  Under the "NAME", that's what you are selecting under the "models" section.  Anyway, back into gear.  Re-launch opencode :

    ~/.opencode/bin/opencode

Then, connect to ollama by typing :

    /connect ollama 

Congrats, it's running.  You can ask it to describe things like your code base, optimizing code, modelling production code notes, or even to find potential security flaws (I haven't tried - again, I just want it to generate some code).  Let's try it again, but we'll start with the simpler requests from earlier...

...and no dice.  It just (again) tells me it can't do it.  Perhaps it's the model?

Removing Llama and Installing gpt-oss:20b

To remove our llama3.3:latest model, simply run :

    ollama rm llama3.3:latest

It will tell you it was deleted. Let's now install :

    ollama pull gpt-oss:20b

Ready or not, here we go. 

Testing the gpt-oss:20b LLM

With the 20b instance installed, let's see how long this takes to build a web page.  We'll use the same prompt that we did with Llama3.3.

    ollama run gpt-oss:20b

This one dumped in "thinking", and then spit out an HTML page combination within 1 minute.  No assumptions that this was an automobile, and created an actually interesting web page within a matter of 3 minutes :

Much better performance. Minutes are better than days when it comes to waiting, right?  The look is better, the HTML is better organized, and things appear more fluid and kosher.

Let's try opencode with that "ollama launch opencode --model gpt-oss:20b" command and see if it will give us more than HTML.  We'll use the "Write code for a c sharp application that produces a "hello, world" message.  Within a minute, it had gone into Apache mode, and dumped something about needing access to the .htaccess file (we got a little derailed).

But it responded.  Let's try :

Write a basic c# application.

And it spit out actual code :

Very interesting.   The opencode failures were completely in the model, not opencode!

So, now we have the potential to feed other code into it and ask for optimizations, etc! 


Wednesday, August 12, 2026

Docker and Nagios

Note, this is a first run.  What I want to do is reduce as many files required as possible for the running, but I have not done so (e.g. mapping direct files, instead of entire directories).  But, the first run at this is functions.

Note, the jasonrivers/nagios image runs a web service of its own that requires cgi to be in the root.  This means that you won't be able to utilize proxy pass in Apache HTTPd unless you are mapping root for root (e.g. "/"), and not adding a "/nagios" onto the URL.

Okay, down to the nitty gritty. Here's how we'll go about this.

Here we go. 


Set up NRPE (Nagios Remote Plugin Executor)

First, install nrpe (this is so that the nagios instance can monitor our docker server that this is running on) on your docker host.  This is specifically because you probably want to monitor it, and host-to-host monitoring is easiest through nrpe.

    sudo yum install nrpe
    yum install nagios-plugins-swap.x86_64 nagios-plugins-uptime.x86_64 nagios-plugins-load.x86_64 nagios-plugins-disk.x86_64 nagios-plugins-ping.x86_64 nagios-plugins-check-updates.x86_64 nagios-plugins-users.x86_64 nagios-plugins-procs.x86_64
    

Edit your NRPE configuration (/etc/nagios/nrpe.cfg) and configure the commands you want.  Additionally, I changed my allowed hosts to match the docker network.  If you are absolutely crazy, comment out allowed_hosts out, which will allow ANYTHING to run checks against the service. My commands are :

    command[check_users]=/usr/lib64/nagios/plugins/check_users -w 5 -c 10
    command[check_load]=/usr/lib64/nagios/plugins/check_load -r -w .15,.10,.05 -c .30,.25,.20
    command[check_root]=/usr/lib64/nagios/plugins/check_disk -w 20% -c 10% -p /dev/mapper/rhel-root
    command[check_home]=/usr/lib64/nagios/plugins/check_disk -w 20% -c 10% -p /dev/mapper/rhel-home
    command[check_swap]=/usr/lib64/nagios/plugins/check_swap
    command[check_zombie_procs]=/usr/lib64/nagios/plugins/check_procs -w 5 -c 10 -s Z
    command[check_total_procs]=/usr/lib64/nagios/plugins/check_procs -w 275 -c 300
    command[check_uptime]=/usr/lib64/nagios/plugins/check_uptime
    command[check_gateway]=/usr/lib64/nagios/plugins/check_ping -H 10.0.0.1 -w 5,1% -c 10,5%
    command[check_internet]=/usr/lib64/nagios/plugins/check_ping -H 8.8.8.8 -w 20,1% -c 30,5%

then enable and start NRPE :

    systemctl enable nrpe
    systemctl start nrpe

And the service should be listening on port 5666.

Nagios Docker

Next, create the docker container directory structure :

    cd /docker/images/path
    mkdir nagios
    cd nagios
    mkdir {etc,var,plugins,graphvar,graphetc}

launch the basic, no frills docker image first :

    docker run --name nagios4 jasonrivers/nagios

Then, hit ctrl-c to break out of it.  This installs the image with the name nagios4 that we can reference and copy out the configs we'll need.  Now you can copy the files out that you need :

    docker cp nagios4:opt/nagios/etc etc/
    docker cp nagios4:opt/nagios/var var/
    chown polkitd var
    chown polkitd graphvar
    

Clean up that image now :

    docker container rm nagios4

Now, you probably want to add the NRPE checks for the docker host at this point.  Edit the etc/objects/commands.cfg file, and add the following :

    define command {
            command_name    check_nrpe
            command_line    $USER1$/check_nrpe -H $HOSTADDRESS$ -c $ARG1$
    }

Then, edit the localhost.cfg (or create a new cfg file and ensure the nagios.cfg includes it) and add the host for your docker and any checks you want to run that you created in your nrpe configuration, e.g. :

    define service{
            use                  local-service,graphed-service   ; Name of service template to use
            host_name            docker
            service_description  Docker Host Internet
            check_command        check_nrpe!check_internet
    }

Next, you can modify those configurations, and launch your custom image using :

    docker run --name nagios -d --restart unless-stopped -e NAGIOS_FQDN=sharktooth.net -e NAGIOS_TIMEZONE=America/Boise -v /opt/docker/nagios/etc:/opt/nagios/etc -v /opt/docker/nagios/var:/opt/nagios/var -v /opt/docker/nagios/plugins:/opt/Custom-Nagios-Plugins -v /opt/docker/nagios/graphetc:/opt/nagiousgraph/etc -v /opt/docker/nagios/graphvar:/opt/nagiosgraph/var -p 0.0.0.0:6080:80 jasonrivers/nagios:latest

That should give it a quick start and have you online.  You can now customize those configurations and restart the container as needed.


What is installed

Now, I wanted some customizations, such as monitoring mqtt, but I kinda need to know what is included.  Sure, we have a custom plugin directory we can stuff things into, but if it's already there, then why should I also create a plugin?

While a simple directory listing would suffice, I just used the typical docker cp command, and copied out the plugin directory to see what had been installed.

    [username@docker-host ~]$ docker cp nagios:/opt/nagios/libexec tmp/
    Successfully copied 8.42MB to /home/username/tmp/
    [username@docker-host ~]$ ls -l tmp/libexec/
    total 8300
    -rwxr-xr-x. 1 username 1026 194024 Nov 6 2024 check_apt
    -rwxr-xr-x. 1 username 1026 2342 Nov 6 2024 check_breeze
    -rwxr-xr-x. 1 username 1026 205824 Nov 6 2024 check_by_ssh
    lrwxrwxrwx. 1 username 1026 9 Nov 6 2024 check_clamd -> check_tcp
    -rwxr-xr-x. 1 username 1026 139256 Nov 6 2024 check_cluster
    -rwxr-xr-x. 1 username 1026 204664 Nov 6 2024 check_dbi
    -r-sr-xr-x. 1 username 1026 210952 Nov 6 2024 check_dhcp
    -rwxr-xr-x. 1 username 1026 193304 Nov 6 2024 check_dig
    -rwxr-xr-x. 1 username 1026 336488 Nov 6 2024 check_disk
    -rwxr-xr-x. 1 username 1026 10130 Nov 6 2024 check_disk_smb
    -rwxr-xr-x. 1 username 1026 220352 Nov 6 2024 check_dns
    -rwxr-xr-x. 1 username 1026 97440 Nov 6 2024 check_dummy
    -rwxr-xr-x. 1 username 1026 5062 Nov 6 2024 check_file_age
    -rwxr-xr-x. 1 username 1026 6500 Nov 6 2024 check_flexlm
    -rwxr-xr-x. 1 username 1026 203824 Nov 6 2024 check_fping
    lrwxrwxrwx. 1 username 1026 9 Nov 6 2024 check_ftp -> check_tcp
    -rwxr-xr-x. 1 username 1026 156760 Nov 6 2024 check_game
    -rwxr-xr-x. 1 username 1026 191392 Nov 6 2024 check_hpjd
    -rwxr-xr-x. 1 username 1026 342280 Nov 6 2024 check_http
    -r-sr-xr-x. 1 username 1026 252320 Nov 6 2024 check_icmp
    -rwxr-xr-x. 1 username 1026 146576 Nov 6 2024 check_ide_smart
    -rwxr-xr-x. 1 username 1026 15271 Nov 6 2024 check_ifoperstatus
    -rwxr-xr-x. 1 username 1026 14477 Nov 6 2024 check_ifstatus
    lrwxrwxrwx. 1 username 1026 9 Nov 6 2024 check_imap -> check_tcp
    -rwxr-xr-x. 1 username 1026 6981 Nov 6 2024 check_ircd
    lrwxrwxrwx. 1 username 1026 9 Nov 6 2024 check_jabber -> check_tcp
    -rwxr-xr-x. 1 username 1026 2363 Nov 6 2024 check_jenkins
    -rwxr-xr-x. 1 username 1026 204960 Nov 6 2024 check_ldap
    lrwxrwxrwx. 1 username 1026 10 Nov 6 2024 check_ldaps -> check_ldap
    -rwxr-xr-x. 1 username 1026 181336 Nov 6 2024 check_load
    -rwxr-xr-x. 1 username 1026 8182 Nov 6 2024 check_log
    -rwxr-xr-x. 1 username 1026 25719 Nov 6 2024 check_mailq
    -rwxr-xr-x. 1 username 1026 19217 Nov 6 2024 check_mem.pl
    -rwxr-xr-x. 1 username 1026 14163 Nov 6 2024 check-mqtt.py
    -rwxr-xr-x. 1 username 1026 146112 Nov 6 2024 check_mrtg
    -rwxr-xr-x. 1 username 1026 148776 Nov 6 2024 check_mrtgtraf
    -rwxr-xr-x. 1 username 1026 14953 Nov 6 2024 check_mssql_database.py
    -rwxr-xr-x. 1 username 1026 21856 Nov 6 2024 check_mssql_server.py
    -rwxr-xr-x. 1 username 1026 158376 Nov 6 2024 check_nagios
    -rwxr-xr-x. 1 username 1026 12200 Nov 6 2024 check_ncpa.py
    lrwxrwxrwx. 1 username 1026 9 Nov 6 2024 check_nntp -> check_tcp
    lrwxrwxrwx. 1 username 1026 9 Nov 6 2024 check_nntps -> check_tcp
    -rwxr-xr-x. 1 username 1026 156328 Nov 6 2024 check_nrpe
    -rwxr-xr-x. 1 username 1026 206624 Nov 6 2024 check_nt
    -rwxr-xr-x. 1 username 1026 225112 Nov 6 2024 check_ntp
    -rwxr-xr-x. 1 username 1026 203008 Nov 6 2024 check_ntp_peer
    -rwxr-xr-x. 1 username 1026 207672 Nov 6 2024 check_ntp_time
    -rwxr-xr-x. 1 username 1026 219552 Nov 6 2024 check_nwstat
    -rwxr-xr-x. 1 username 1026 9495 Nov 6 2024 check_oracle
    -rwxr-xr-x. 1 username 1026 172160 Nov 6 2024 check_overcr
    -rwxr-xr-x. 1 username 1026 195272 Nov 6 2024 check_pgsql
    -rwxr-xr-x. 1 username 1026 207440 Nov 6 2024 check_ping
    lrwxrwxrwx. 1 username 1026 9 Nov 6 2024 check_pop -> check_tcp
    -rwxr-xr-x. 1 username 1026 209304 Nov 6 2024 check_procs
    -rwxr-xr-x. 1 username 1026 170464 Nov 6 2024 check_real
    -rwxr-xr-x. 1 username 1026 9675 Nov 6 2024 check_rpc
    -rwxr-xr-x. 1 username 1026 1629 Nov 6 2024 check_sensors
    lrwxrwxrwx. 1 username 1026 9 Nov 6 2024 check_simap -> check_tcp
    -rwxr-xr-x. 1 username 1026 237160 Nov 6 2024 check_smtp
    -rwxr-xr-x. 1 username 1026 250280 Nov 6 2024 check_snmp
    lrwxrwxrwx. 1 username 1026 9 Nov 6 2024 check_spop -> check_tcp
    -rwxr-xr-x. 1 username 1026 8481 Nov 6 2024 check_sql
    -rwxr-xr-x. 1 username 1026 166736 Nov 6 2024 check_ssh
    -rwxr-xr-x. 1 username 1026 12544 Nov 6 2024 check_ssl_validity
    lrwxrwxrwx. 1 username 1026 9 Nov 6 2024 check_ssmtp -> check_tcp
    -rwxr-xr-x. 1 username 1026 143696 Nov 6 2024 check_swap
    -rwxr-xr-x. 1 username 1026 218216 Nov 6 2024 check_tcp
    -rwxr-xr-x. 1 username 1026 167368 Nov 6 2024 check_time
    lrwxrwxrwx. 1 username 1026 9 Nov 6 2024 check_udp -> check_tcp
    -rwxr-xr-x. 1 username 1026 186936 Nov 6 2024 check_ups
    -rwxr-xr-x. 1 username 1026 133536 Nov 6 2024 check_uptime
    -rwxr-xr-x. 1 username 1026 131696 Nov 6 2024 check_users
    -rwxr-xr-x. 1 username 1026 8193 Nov 6 2024 check_vpn
    -rwxr-xr-x. 1 username 1026 3266 Nov 6 2024 check_wave
    lrwxrwxrwx. 1 username 1026 20 Nov 6 2024 mibs -> /usr/share/snmp/mibs
    -rwxr-xr-x. 1 username 1026 131912 Nov 6 2024 negate
    -rwxr-xr-x. 1 username 1026 124112 Nov 6 2024 remove_perfdata
    -rwxr-xr-x. 1 username 1026 123440 Nov 6 2024 urlize
    -rwxr-xr-x. 1 username 1026 1920 Nov 6 2024 utils.pm
    -rwxr-xr-x. 1 username 1026 2792 Nov 6 2024 utils.sh [username@docker-host ~]$

This tells me exactly what we have available to us straight out of the box, and lists things like check_jabber, check-mqtt.py, and check_snmp (so, in theory, I COULD monitor my NAS without customization - that's cool).


Monitoring MQTT and SNMP

Let's get those set up.  Now, in the commands.cfg file, there is already a check_snmp command configured.  That means we don't have to define a command, but we just point to our NAS for HDD monitoring.  We have three, just because I can :

    # NAS stuff
    # the overall health
    define service{
            use                             local-service,graphed-service
            host_name                       nas
            service_description             NAS Overall Health
    	check_command			check_snmp!-C community -o .1.3.6.1.4.1.6574.1.1 -r 1
    }
    # the NAS filesystems
    define service{
            use                             local-service,graphed-service
            host_name                       nas
            service_description             NAS Volume 1 Health
    	check_command			check_snmp!-C NASHealthCheck -o .1.3.6.1.4.1.6574.3.1.1.3.0 -r 1
    }
    # NAS temperature
    define service{
            use                             local-service,graphed-service
            host_name                       nas
            service_description             NAS Temperature
    	check_command			check_snmp!-C NASHealthCheck -o .1.3.6.1.4.1.6574.1.2 -r 3
    }  

I loaded it, and all the snmp just failed.  Bah!  Wait a minute.... didn't I have to open UDP ports for the weatherflow crap?

Let's add it to the firewall.  I threw the entire pot of spaghetti at the wall hoping something stuck :

    sudo firewall-cmd --zone public --permanent --add-service=snmp
    sudo firewall-cmd --permanent --add-port=161/udp sudo firewall-cmd --reload

Nagios eventually loaded those and they started checking OK.

On to MQTT.  This one doesn't have a command defined, so we'll have to do that first, and we can (in theory) run the check-mqtt.py file to get output.

Note, to be able to run the check-mqtt.py from a server that didn't have this properly installed to (e.g. not in the container), I had to install the python3-paho-mqtt.noarch package.  Once done, I could run the "./check-mqtt.py" to see output.

    [username@docker-host nagios]$ /home/username/tmp/libexec/check-mqtt.py  -?
    usage: check-mqtt.py [-h] [-d] [-H ] [-P ] [-u ] [-p ] [-m ] [-e ] [--sleep ] [-a ] [-C ] [-k ] [-n] [-t ]
                         [-s ] [-r] [-l ] [-v ] [-o ] [-w ] [-c ] [-S] [-V]
    check-mqtt.py: error: unrecognized arguments: -?
    [username@docker-host nagios]$

This gives us the basics we need to build a command.

    define command {
            command_name    check_mqtt
            command_line    $USER1$/check-mqtt.py -H $HOSTNAME$ $ARG1$
      }

Slap together a quick command like (I put the options from the output into there, but they are also listed at https://github.com/check-plugins/check_mqtt ) :

    # check MQTT queues
    define service{
            use                             local-service,graphed-service
            host_name                       docker
            service_description             MQTT
    	check_command			check_mqtt!-t topic
    # usage: check-mqtt.py [-h] [-d] [-H ] [-P ] [-u ] [-p ] [-m ] [-e ] [--sleep ] [-a ] [-C ] [-k ] [-n] [-t ]
    #                     [-s ] [-r] [-l ] [-v ] [-o ] [-w ] [-c ] [-S] [-V]
    }

and restart Nagios.  I do have some tweaking to get it to work right, since it went into a yellow/WARNING state with some mumbo jumbo about "No output on stdout".  So, let's fix that hurdle next.

    [username@docker-host nagios]$ docker container exec nagios /opt/nagios/libexec/check-mqtt.py -H docker -t topic
    Traceback (most recent call last):
      File "/opt/nagios/libexec/check-mqtt.py", line 257, in 
        mqttc = paho.Client('nagios-%d' % (os.getpid()), clean_session=True, userdata=userdata, protocol=4)
                ^^^^^^^^^^^^^^^^^^^^^^^^^^^^^^^^^^^^^^^^^^^^^^^^^^^^^^^^^^^^^^^^^^^^^^^^^^^^^^^^^^^^^^^^^^^
      File "/usr/local/lib/python3.12/dist-packages/paho/mqtt/client.py", line 772, in __init__
        raise ValueError(
    ValueError: Unsupported callback API version: version 2.0 added a callback_api_version, see docs/migrations.rst for details
    [username@docker-host nagios]$
    

Quick research, tells me the Client declaration needs modification after an update to a version, so I copied the check-mqtt.py into the custom plugins folder for the docker instance with the following patch applied to it :

    -- /home/username/tmp/libexec/check-mqtt.py	2024-11-06 02:35:46.000000000 -0700
    +++ plugins/check-mqtt.py	2026-08-13 08:22:59.243414998 -0600
    @@ -254,7 +254,7 @@ userdata = {
         'have_response' : False,
         'start_time'    : time.time(),
     }
    -mqttc = paho.Client('nagios-%d' % (os.getpid()), clean_session=True, userdata=userdata, protocol=4)
    +mqttc = paho.Client(paho.CallbackAPIVersion.VERSION1,'nagios-%d' % (os.getpid()), clean_session=True, userdata=userdata, protocol=4)
     mqttc.on_message = on_message
     mqttc.on_connect = on_connect
     mqttc.on_disconnect = on_disconnect
    

The above patch allowed it to run (but note after this) :

    [username@docker-host nagios]$ docker container exec nagios /opt/Custom-Nagios-Plugins/check-mqtt.py -H docker -t topic
    /opt/Custom-Nagios-Plugins/check-mqtt.py:257: DeprecationWarning: Callback API version 1 is deprecated, update to latest version
      mqttc = paho.Client(paho.CallbackAPIVersion.VERSION1,'nagios-%d' % (os.getpid()), clean_session=True, userdata=userdata, protocol=4)
    OK - message from topic at docker in 0.31s | response_time=0.31 value=PiNG
    [username@docker-host nagios]$

And then I updated my command to point to the new module :

    define command {
            command_name    check_mqtt
            command_line    /opt/Custom-Nagios-Plugins/check-mqtt.py -H $HOSTNAME$ $ARG1$
            #command_line    $USER1$/check-mqtt.py -H $HOSTNAME$ $ARG1$
    }

Success! I'm working, even with the deprecation warning.  I did create an issue in the jasonrivers/nagios github for it, and tronyx there bounced me to an update on Feb 11, 2026, where the code was already patched in a better way.  I'd recommend applying the latest plugin and using it if the image doesn't have the plugin already patched by the time you are reading this.

Thursday, February 12, 2026

Dock(er) Wok

Docker is a simple way to create virtualization without having full systems running.  I took a moment to figure out how to run docker in relation to Postgres.

Note you need at least three servers for this for it to have any sort of redundancy. One is the "master".  You can probably get away with two (run the manager on one of the nodes), but I do not recommend this.  Really, you could get away with one server that runs the manager and two instances (I did), but know that if you don't run the docker instances on separate hosts, you've now lost all high availability, because if that server fails, the whole stack will cease to exist.

First, install Docker :

    sudo apt-get install docker.io
    sudo systemctl enable docker
    sudo systemctl start docker
    

Then, create your swarm (anything recent should have swarm built in, you just need to set it up).

    
    sudo docker swarm init --advertise-addr 192.168.x.x
    

Next, join a docker worker to the swarm

    username@server1:~$ sudo docker swarm init --advertise-addr 192.168.0.3
    Swarm initialized: current node (NODE IDENTIFIER) is now a manager.
    
    To add a worker to this swarm, run the following command:
    
        docker swarm join --token TOKEN_STRING 192.168.0.3:2377
    
    To add a manager to this swarm, run 'docker swarm join-token manager' and follow the instructions.
    username@server1:~$
    

Then, on each worker node that isn't the manager, run the command you were provided (use sudo) :

    sudo docker swarm join --token TOKEN_STRING 192.168.1.237:2377
    

Next is your basic configuration.  Each host is relatively identical, with just a few modifications.  Each host has 3 different configuration files, pg_hba.conf, postgresql.conf, and pg_ident.conf.  Let's start by creating our directory structure.

I created a directory to house all of this so I can clear it out quickly after my learning curve.

    mkdir cluster-postgres
    cd cluster-postgres
    mkdir -p {master,slave-1,slave-2}/config
    

Next, create our three files for each host :

    touch {master,slave-1,slave-2}/config/{pg_hba.conf,postgresql.conf,pg_ident.conf}
    

With the files created, let's populate them.  Here's the gist for each host, but at the end, I'll identify differences as needed.

postgresql.conf

This file contains :

    # -----------------------------
    # PostgreSQL configuration file
    # -----------------------------
    #
    
    data_directory = '/data'
    hba_file = '/config/pg_hba.conf'
    ident_file = '/config/pg_ident.conf'
    
    port = 5432
    listen_addresses = '*'
    max_connections = 100
    shared_buffers = 128MB
    dynamic_shared_memory_type = posix
    max_wal_size = 1GB
    min_wal_size = 80MB
    log_timezone = 'Etc/UTC'
    datestyle = 'iso, mdy'
    timezone = 'Etc/UTC'
    
    #locale settings
    lc_messages = 'en_US.utf8'   # locale for system error message
    lc_monetary = 'en_US.utf8'   # locale for monetary formatting
    lc_numeric = 'en_US.utf8'    # locale for number formatting
    lc_time = 'en_US.utf8'       # locale for time formatting
    
    default_text_search_config = 'pg_catalog.english'
    
    #replication
    wal_level = replica
    wal_keep_size = 512MB  # Adjust this value as needed
    archive_mode = on
    archive_command = 'test ! -f /mnt/server/archive/%f && cp %p /mnt/server/archive/%f'
    max_wal_senders = 3
    

However, on the slave nodes, lines 28-34, which contain :

    #replication
    wal_level = replica
    wal_keep_size = 512MB  # Adjust this value as needed
    archive_mode = on
    archive_command = 'test ! -f /mnt/server/archive/%f && cp %p /mnt/server/archive/%f'
    

are removed.

pg_hba.conf

This file contains :

    # TYPE  DATABASE        USER            ADDRESS                 METHOD
    
    host     replication     replicationUser         0.0.0.0/0        md5
    
    # "local" is for Unix domain socket connections only
    local   all             all                                     trust
    # IPv4 local connections:
    host    all             all             127.0.0.1/32            trust
    # IPv6 local connections:
    host    all             all             ::1/128                 trust
    # Allow replication connections from localhost, by a user with the
    # replication privilege.
    local   replication     all                                     trust
    host    replication     all             127.0.0.1/32            trust
    host    replication     all             ::1/128                 trust
    
    host all all all scram-sha-256
    

However, on the slave nodes, line 3 :

    host     replication     replicationUser         0.0.0.0/0        md5
    

is removed.

pg_ident.conf

This file contains :

    # PostgreSQL User Name Maps
    # =========================
    #
    # Refer to the PostgreSQL documentation, chapter "Client
    # Authentication" for a complete description.  A short synopsis
    # follows.
    #
    # This file controls PostgreSQL user name mapping.  It maps external
    # user names to their corresponding PostgreSQL user names.  Records
    # are of the form:
    #
    # MAPNAME  SYSTEM-USERNAME  PG-USERNAME
    #
    # (The uppercase quantities must be replaced by actual values.)
    #
    # MAPNAME is the (otherwise freely chosen) map name that was used in
    # pg_hba.conf.  SYSTEM-USERNAME is the detected user name of the
    # client.  PG-USERNAME is the requested PostgreSQL user name.  The
    # existence of a record specifies that SYSTEM-USERNAME may connect as
    # PG-USERNAME.
    #
    # If SYSTEM-USERNAME starts with a slash (/), it will be treated as a
    # regular expression.  Optionally this can contain a capture (a
    # parenthesized subexpression).  The substring matching the capture
    # will be substituted for \1 (backslash-one) if present in
    # PG-USERNAME.
    #
    # Multiple maps may be specified in this file and used by pg_hba.conf.
    #
    # No map names are defined in the default configuration.  If all
    # system user names and PostgreSQL user names are the same, you don't
    # need anything in this file.
    #
    # This file is read on server startup and when the postmaster receives
    # a SIGHUP signal.  If you edit the file on a running system, you have
    # to SIGHUP the postmaster for the changes to take effect.  You can
    # use "pg_ctl reload" to do that.
    
    # Put your actual configuration here
    # ----------------------------------
    
    # MAPNAME       SYSTEM-USERNAME         PG-USERNAME
    

There are no differences here for each node.

Last Configurations

Create the docker "network" :

sudo docker network create postgres-cluster-network

This will print a fairly large alphanumeric ID. 

Starting the "master"

At this point in time, start the master node using the following command :

    sudo docker run -d --name postgres-master  --net postgres-cluster-network \
    -e POSTGRES_USER=postgresadmin -e POSTGRES_PASSWORD=admin123 \
    -e POSTGRES_DB=postgresdb -e PGDATA="/data" -v ${PWD}/master/pgdata:/data \
    -v ${PWD}/master/config:/config -v ${PWD}/master/archive:/mnt/server/archive \
    -p 5000:5432 postgres:latest -c 'config_file=/config/postgresql.conf'
    

If you haven't downloaded the postgres docker image yet, this will actually cause it to try and install.  If you get an error about it already existing because you tried to start it one and it gave you an error :

    docker: Error response from daemon: Conflict. The container name "/postgres-master" is already in use by container "6362ca473d3f29b7fe1bf02558f5a871fb6cf6827eff23fe01714f34cb386951". You have to remove (or rename) that container to be able to reuse that name.
    

Then list the dockers, and delete it :

    username@server1:~/postgres-cluster$ sudo docker ps -a
    CONTAINER ID   IMAGE             COMMAND                  CREATED          STATUS    PORTS     NAMES
    6362ca473d3f   postgres:latest   "docker-entrypoint.s…"   10 minutes ago   Created             postgres-master
    username@server1:~/postgres-cluster$ sudo docker rm 6362ca473d3f
    6362ca473d3f
    username@server1:~/postgres-cluster$ sudo docker ps -a
    CONTAINER ID   IMAGE     COMMAND   CREATED   STATUS    PORTS     NAMES
    username@server1:~/postgres-cluster$
    

Now try to start it if it had previous failed again, and it should simply give you a large alphanumeric ID again.

Next, create a replication user :

    username@server1:~$ sudo docker exec -it postgres-master bash
    [sudo] password for username:          
    root@63919c16e356:/# createuser -U postgresadmin -P -c 5 --replication replicationUser
    Enter password for new role: 
    Enter it again: 
    root@63919c16e356:/# exit
    exit
    username@server1:~$
    

Just type exit and get back to the prompt.

Now, we can move on to starting the slaves. 

Starting the slaves

For each node, run :

    username@server1:~$ sudo docker run -it --name postgres-slave1 --rm \
    > --net postgres-cluster-network \
    > -v ${PWD}/slave-1/pgdata:/data \
    > --entrypoint /bin/bash postgres:latest
    root@447571e3e11e:/#
    

This will put you in a bash prompt as "interactive", where you then run :

    pg_basebackup -h postgres-master -p 5432 -U replicationUser -D /data/ -Fp -Xs -R
    

The command initiates replication, and will use the password you specified on the master node when you started that up with the "createuser" command.

Repeat for slave-2 (of course, replacing postgres-slave1 with postgres-slave2, and the slave-1 folder names with slave-2).

Create standby instances 

Run the following :

    sudo docker run -d --name postgres-slave1 --net postgres-cluster-network \
    -e POSTGRES_USER=postgresadmin -e POSTGRES_PASSWORD=admin123 \
    -e POSTGRES_DB=postgresdb -e PGDATA="/data"  \
    -v ${PWD}/slave-2/pgdata:/data -v ${PWD}/slave-2/config:/config \
    -v ${PWD}/slave-2/archive:/mnt/server/archive -p 5002:5432 \
    postgres:latest -c 'config_file=/config/postgresql.conf'
    

Repeat for slave-2 (of course, replacing postgres-slave1 with postgres-slave2, and the slave-1 folder names with slave-2).

Test It

Connect to the master node using :

    sudo docker exec -it postgres-master bash
    

From in here, you can run your psql commands to create databases and manipulate whatever you need.

    psql --username=postgresadmin postgresdb
    

Exit, and then check the other slave nodes by connecting to them (sudo docker exec) and running psql to query any tables you've created and populated with data.

Friday, August 22, 2025

Old Hard Drives

When you visit family, and someone hands you an old hard drive from 22 years ago and asks for a data recovery because it could have your moms letters on it, you don't question it.  Grab that hard drive and take it.


So I started a little journey.  I popped it into my PATA USB case, and plugged it in.  It did not register with the system (I'm using Linux so I should at least see a USB interface get logged, even if the hardware has failed).

It spun up.  There were no clicks (so the hardware had not failed).  I dug into the logs - nothing, indicating the interface board was likely the problem.

So, I took the interface board off.  It was a Western Digital WD400 from 2003 (I told you it was 22 years old).  I grabbed my Western Digital WD400 from my case and started to swap the interface boards temporarily to commence a recovery.

One screw changed between them.  There are associated with the WD400 product line, but actually have different model numbers.  I'd wager that if it wasn't for that screw being in the wrong place and not being able to be anchored down properly, it would have been perfect, yet this would not be.

I could have 3D printed a bracket that fit across and held the interface circuit board down, but I just put the original back in, and looked at the jumpers.  Old PATA/IDE hard drives had a jumper on them for "Master", "Slave", and sometimes one or two other options (such as "CS" or "Chip Select").  There were no more than two IDE drives on the same IDE cable because of the electronic design.  One would be designated the "master", and the other a "slave".  In later years, they added a "chip select" option to try and make it a little more plug-and-play.

I had the thought I should move the jumper from Master to CS, and suddenly the old interface loaded when it was reconnected.  Ah hah!

It loaded no files (an empty filesystem).  The next step is always to run a recovery, just in case a new filesystem was put over the top of an old one.  So, I ran :

    photorec /d Documents/recovery /dev/sdc

This dumped a few web files (CSS, XML, and HTML), a few executables (EXE and DLL), a few TXT files (that turned out to be nothing more than configuration files, registry files and some text extracted from executables).  Two files, a WAB and an EDB, both stood out to me, because a WAB is supposedly a Web Address Book, and EDB is an Exchange Database.  Turns out, they were simply mislabeled data files for the executables.

 No, the drives did not have any letters from my mother.  But it's better to know than not to. 

Wednesday, March 15, 2023

Hackers-R-Us - Openprovider.com

 A few days ago, I read a Cybersecurity blog post about trusting Freenom, a domain registrar that handles .cf, .ga, .gq, .ml, and .tk TLD's (top level domains).  Suddenly, we have an account that receives a message :

    
    284892930
    We recently contacted you to inform that our verification system can't verif your payment in MyVerizon-your app.
    please update payment information manually to avoid limitations on your_service.
    cphrc.org/?o&Vz0N6ZvH
    

This message comes through the registrar, openprovider.com, not freenom, and appears to fully be a phishing attempt for mobile account take over (cphrc.org

    
    user@workstation:~$ whois cphrc.org|grep -i registrar:
    Registrar: Hosting Concepts B.V. d/b/a Registrar.eu
    user@workstation:~$
    

The registration appears to be done through a third party registrar with an .eu top-level domain, and that indicates this domain came through Europe.  A European registration trying to handle a United States mobile account is not just a red flag, but an impossible-to-pass hurdle for me.  The standard abuse forms have been filled out in order to shut it down quickly.

Wednesday, August 3, 2022

Diamond VC500 Video Capture in Linux

 I wanted to do some video capture, and a local place had a Diamond VC500.  I ordered one off of Amazon, and it flat out didn't work.  The Windows 10 installation just gave me a black screen all the time.  Troubleshooting failed, even though I hooked the same old camcorder device up to an RCA TV and it displayed fine there, so I new it was device-specific.  I hooked it up in Linux, and it told me there was no signal on the composite using the v4l command to check it:

    v4l2-ctl --get-fmt-video -d /dev/video0 --all

Amazon's return policy was a life saver.  I had them send me a replacement.

 I tried WIndows 10 again (because that was the native driver supported by the company and... it just gave me a black screen again, no matter what I tried to do.  It just wouldn't work.

Since Linux had given me the no hsync error on the previous device, I decided to try that one and see if it gave me anything different.  I booted into Linux, and ran the command again.  I was a little bit shocked to see the "Video input : 0 (Composite1: ok)" message glaring me in the face :

    
    ┌──(username@hostname)-[~]
    └─$ v4l2-ctl --get-fmt-video -d /dev/video0 --all         
    Driver Info:
            Driver name      : cx231xx
            Card type        : Geniatech OTG102
            Bus info         : usb-0000:01:00.0-4
            Driver version   : 5.18.5
            Capabilities     : 0x85200011
                    Video Capture
                    VBI Capture
                    Read/Write
                    Streaming
                    Extended Pix Format
                    Device Capabilities
            Device Caps      : 0x05200001
                    Video Capture
                    Read/Write
                    Streaming
                    Extended Pix Format
    Priority: 2
    Video input : 0 (Composite1: ok)
    Video Standard = 0x00001000
            NTSC-M
    Format Video Capture:
            Width/Height      : 720/480
            Pixel Format      : 'YUYV' (YUYV 4:2:2)
            Field             : Interlaced
            Bytes per Line    : 1440
            Size Image        : 691200
            Colorspace        : SMPTE 170M
            Transfer Function : Default (maps to Rec. 709)
            YCbCr/HSV Encoding: Default (maps to ITU-R 601)
            Quantization      : Default (maps to Limited Range)
            Flags             : 
    Crop Capability Video Capture:
            Bounds      : Left 0, Top 0, Width 720, Height 480
            Default     : Left 0, Top 0, Width 720, Height 480
            Pixel Aspect: 11/10
    Selection Video Capture: crop_default, Left 0, Top 0, Width 720, Height 480, Flags: 
    Selection Video Capture: crop_bounds, Left 0, Top 0, Width 720, Height 480, Flags: 
    Streaming Parameters Video Capture:
            Frames per second: 29.970 (30000/1001)
            Read buffers     : 2
    
    User Controls
    
                         brightness 0x00980900 (int)    : min=0 max=255 step=1 default=128 value=128 flags=slider
                           contrast 0x00980901 (int)    : min=0 max=127 step=1 default=64 value=64 flags=slider
                         saturation 0x00980902 (int)    : min=0 max=127 step=1 default=64 value=64 flags=slider
                                hue 0x00980903 (int)    : min=-128 max=127 step=1 default=0 value=0 flags=slider
                             volume 0x00980905 (int)    : min=0 max=65535 step=655 default=60928 value=60928 flags=slider
                            balance 0x00980906 (int)    : min=0 max=65535 step=655 default=32768 value=32768 flags=slider
                               bass 0x00980907 (int)    : min=0 max=65535 step=655 default=32768 value=32768 flags=slider
                             treble 0x00980908 (int)    : min=0 max=65535 step=655 default=32768 value=32768 flags=slider
                               mute 0x00980909 (bool)   : default=0 value=0
                                                                                                                                                                     
    ┌──(username@hostname)-[~]
    └─$
    

 So I launched VLC to see if I could see it.  It gave me video, but it wasn't the greatest :

I've never  captured using VLC, so this would be a learning curve.  Since it only worked in Linux, it was my only option.  I've got to figure this one out.  First, let's find the devices we need to use with two commands, "sudo dmesg|grep cx231xx|grep 'Registered video device'" and "arecord -l" :

    ┌──(username@hostname)-[~]
    └─$ sudo dmesg|grep cx231xx|grep 'Registered video device'
    [ 221.933201] cx231xx 1-4:1.1: Registered video device video0 [v4l2]
    
    ┌──(username@hostname)-[~]
    └─$ arecord -l **** List of CAPTURE Hardware Devices **** card 1: Generic [HD-Audio Generic], device 0: ALC1220 Analog [ALC1220 Analog] Subdevices: 1/1 Subdevice #0: subdevice #0 card 1: Generic [HD-Audio Generic], device 2: ALC1220 Alt Analog [ALC1220 Alt Analog] Subdevices: 1/1 Subdevice #0: subdevice #0 card 2: Cx231xxAudio [Cx231xx Audio], device 0: Cx231xx Audio [Conexant cx231xx Capture] Subdevices: 0/1 Subdevice #0: subdevice #0 ┌──(username@hostname)-[~] └─$

With those devices known (video0 and card 2 are identifying the cx231xx / OTG102 / Diamond VC500 video captuire device), we can configure VLC for a capture.  Use "Video camera" for the capture mode, and set the device to match (it should have the same thing from the dmesg output above, with a /dev/ added to the front of it).  The audio is a little more difficult - the arecord -l showed the cx231xx device on "card 2".  So, in the audio device name, find the hw:2,0 card.  Set the video standard to an appropriate setting (I'm doing this inside the US, so I went with "NTSC M.  You can click on "play" to test it.  Once you are good with the settings, do it all over, and instead of clicking play, click the little arrow beside it and click on the "Convert" option.

Unfortunately, it absolutely failed.  It [sort of] had a video signal.  This Diamond VC500 really can't function well.  Perhaps it is a USB interface issue, but I'm kind of giving up (I used a USB 3.0 interface, maybe that capable was bad).

So, I'm now trying an HDMI converter and an HDMI capture device.  The converter picks up the signal well enough, so now it's a matter of checking the capture device when it gets here.

If that doesn't pop open a convert window, close VLC and re-start it, then get to the convert option again, it should pop open the convert window.  Click on "browse", and select a filename.  Change the profile to something with a 720x480, since that is what the v4l2-ctl command revealed as resolution for this card above.  Then just click on start, and then press play on your VCR or camcorder.

When done, click the stop button on the VCR and then the stop button in VLC.  You should now be able to find your file and play it like any other media file!

Wednesday, May 18, 2022

RGB Light Bulbs - Finally

 I've gone the rounds with Chinese hardware that is based way too much in the cloud, or with stupid configurations that are supposed to be "easy" but open your phone up to an application that presents your local Wi-Fi configuration to an untrusted application.  (It all started with a Feit Electric RGB light bulb from Costco, and just seemed to get worse from there.)

Then I found an Athom LB01 7 Watt light bulb on Amazon.  It's an E27 format, meaning it plugs into a standard light socket, and is based on the ESP8266 hardware.  That likely meant it was hackable.  So, I ordered two of them.

They shipped from China.  Not a good initial sign, but let's see what this thing has going on.

Starting out, the instructions had this set up list of six steps.  The first step was plug it in and power it up, and then find a new Wi-Fi called "Homekit_XXXX".  This was the first sign of life for these bulbs. That meant that these things were configurable using a web browser on a computer.... so no unsecured, trashy, untrusted phone application requiring access to all my phones data was required.  Woohoo!  Plug that thing in and turn it on.  Yes, indeed.  A new wireless network showed up :

I connected, and ran "ipconfig" to see what the gateway was.

    
    Ethernet adapter Bluetooth Network Connection:
    
       Media State . . . . . . . . . . . : Media disconnected
       Connection-specific DNS Suffix  . :
    
    Wireless LAN adapter Wi-Fi:
    
       Connection-specific DNS Suffix  . :
       Link-local IPv6 Address . . . . . : fe80::f5d9:f994:7e91:6c88%13
       IPv4 Address. . . . . . . . . . . : 192.168.4.2
       Subnet Mask . . . . . . . . . . . : 255.255.255.0
       Default Gateway . . . . . . . . . : 192.168.4.1
    
    C:\Users\Username>
    

So, I see it created a 192.168.4.X network.  I opened the browser and connected.

Then, I found this nifty little tab in the web interface on which a firmware could be uploaded.  On that about page is the MAC address, if you are going to add static DHCP addresses or allow a MAC onto your network.  Make a note of that.

Wait a minute..... that means that I don't even need to break it open to find soldering tabs to re-flash firmware?  Seriously?  This light bulb just got even better.  I have to just try a random firmware.

I grabbed the WLED firmware from some random page (I trust that more than I trust Chinesium, right?), and uploaded it.  It gave me a nice progress bar, and then the bulb turned off and then the browser went into a "can't be reached".  Of course, that thing had to reboot, so I expect that behavior.  I had to reconnect to the new network.

BTW, the default AP mode firmware password is "wled1234".  I'd change that quickly.  In my neighborhood, I may have trained a few neighbor kids to run amok with stuff like this.  Open a web browser tab, and point it to 4.3.2.1 after you've connected to WLED-AP.  The initial page is a classic 80's style look to it.

The first thing to do is click on the WIFI SETTINGS button.

The fields that are critical are the Network name and password, the mDNS address, and the AP SSID and associated password.  Set them properly, and hit save (at the top).

Once you have it configured for your wireless network, get the new IP address for the device, and re-connect once more to the light bulb.  At this point, you will get a green light on the bulb when it is turned on (it might not be on initially - you can flip the power switch on the web interface a few times just to see).

Click on the config button, because we have to make a few changes.  Then, click on "LED Preferences", and (under the Hardware setup), alter the LED outputs.  Change the 1: from WS281x" to "PWM RGB+CCT" (it's an RGB bulb with CCT, controlled via Pulsed Width Modulation), set the color order to RGB, and the GPIO's as 4, 12, 14, 13, and 5.

4 is the red GPIO pin, 12 is the green GPIO pin, and 14 is the blue GPIO pin.  GPIO 13 is the warm white, and GPIO 5 is the cold white pin.  One more thing before you save - toward the bottom is the Relay GPIO - it's set to 12 by default.  Set this to 0 (or clear it) to avoid a conflict.  NOW you can save it (save button at the top, yet again).

You can now use this as needed.  It will remember those settings.  Congrats!  You now have a light bulb that can be put on a network that doesn't have Internet access, further securing your system!


Saturday, September 25, 2021

Setting Up Apache for Federated Identity

I was loading my environmental data up on a web server through Grafana.  I'd been running LDAP-based authentication for years, and wanted to be able to shut that service down because I was growing weary of updating SSL certificates.  I had Grafana running on it's own TCP port inside, but I desired to expose it (while protecting the data).  I finally broke down and did it.

I started out with two "tutorials" :

Both of these were lacking in information.  For example, there are no instructions on setting up the Google API, and there was a configuration option of "OIDCCryptoPassphrase" that was a variable and no one explained what it needed to be set to.  But, I wanted to get it done.

First, I went through Google.  I'd not set up google cloud for my domain before, so this was new.  First, log in to the https://console.cloud.google.com/apis/dashboard?pli=1 (it's the cloud platform).  Once in there, if you don't have a project already, create one.  This is done using the drop down at the top :

Click on "New Project" in the upper right hand corner :

Now, you can create a credential.  Click on "Credentials" on the left, and then "Create Credential" at the top :


Follow the set up guide.  The type will be what you need, in my case, I was doing Apache's HTTPd server, so I went with "Web Application".  The redirect URI setting must match what you use for your OAuth configuration (in the configuration file, actually).  Make sure you have your domains listed, etc.


At this point, copy the ID as well as the client secret.  These need to go into your configuration file for Apache's HTTPd.

You might need to create an "OAuth Consent Screen", too.  Those three configurations in Google are all you need.

Load up your editor you use to change the HTTPd configuration.  The basic lines you are going to need are :

    OIDCProviderMetadataURL https://accounts.google.com/.well-known/openid-configuration
    OIDCClientID CLIENT_ID_FROM_CONFIGURATION
    OIDCClientSecret CLIENT_SECRET_FROM_CONFIGURATION

    # OIDCRedirectURI is a vanity URL, and should not point to any actual content
    OIDCRedirectURI http://hostname.example.com/grafana/redirect_uri
    OIDCCryptoPassphrase PERSONALLY_CHOSEN_PASSPHRASE
    OIDCScope "openid email profile"
    OIDCRemoteUserClaim email

    <Location /grafana/>
        TemplateEnabled off
        AuthType openid-connect
        <RequireAny>
            # not just anyone signed in from google
            # Require valid-user

            # network
            Require ip 10.0.0.

            # signed in with domain
            Require claim hd:silverhawk.net

            # or, signed in with domain (e-mail fall through)
            Require claim "email~^(.*)@silverhawk.net$"

            # or Someone External
            Require claim "email~^username@gmail.com$"
        </RequireAny>

        ProxyPass http://localhost:3000/
        ProxyPassReverse http://localhost:3000/
        Order allow,deny
        Allow from all

        # grafana requires the username to be in a header
        RewriteEngine On
        RewriteRule .* - [E=PROXY_USER:%{LA-U:REMOTE_USER},NS]
        RequestHeader set X-WEBAUTH-USER "%{PROXY_USER}e"
    </Location>

The OIDCClientID and the OIDCClientSecret configuration items are where you stuff the respective items from your OAuth configuration we copied above.  The OIDCCryptoPassphrase is where I was getting lost - this is going to be something you choose, and is specific to the cluster (e.g. so that the cluster can keep state if you hit other servers).

I used a RequireAny to set up multiple options - so, if you are on the local network and sign in to google, you'll get in.  If your primary google address is a silverhawk.net domain, you can get in.  If your e-mail address is username@gmail.com, you can get in.

The rewrite directives are there specifically for Grafana so that Grafana can see the remote_user as the e-mail of the individual who just authenticated.  In your grafana.ini, locate your root_url, and make sure we've added the URI piece we are proxying, e.g. :

    root_url = %(protocol)s://%(domain)s:%(http_port)s/grafana/

Next, locate your "[users]" section, and set the following :

    allow_sign_up = false
    auto_assign_org = true

Next, locate the auth.proxy in your Grafana configuration.  Since we are rolling through HTTPd and it will be doing the authentication, we can let Grafana accept whatever HTTPd feeds to us.

    [auth.proxy]
    enabled = true
    header_name = X-WEBAUTH-USER
    header_property = username
    auto_sign_up = true

The header name should match what was in our rewrite rule, and the header property is the username that is going to get set up.  auto_sign_up needs to be set to true so that we can create accounts on the fly.

Now, restart any processes and give it a test!

Thursday, September 9, 2021

Spotting a Scam

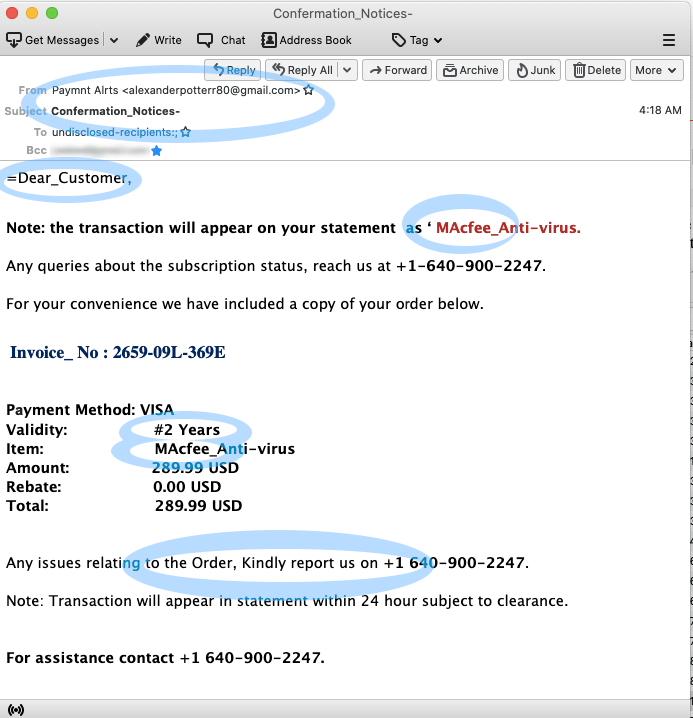
 I received an e-mail (actually, the second one to a different address triggered this, but I'm hitting the first one).  Obviously, it's a scam.  Let's take a look :

First, an e-mail address takes the form of username@domain.  In this one, the "From" address doesn't match who they are pretending to be (they have pconfermations@gmail.com with a name of "Produts Confermations").  The @ portion (the domain) is "gmail.com".  No self-respecting business will send from a domain that is not owned by the business.  That would mean that McAfee e-mails would come from @mcafee.com, not @gmail.com .  The username doesn't even spell things right.  We know from the start that this isn't from McAfee, and whomever it is can't spell to save their life.

Second, the "subject" of the e-mail has awkward characters in it.  Beware of crap that has emoji's or other things in them - they are definitely unofficial.  Underscores in a subject are nearly unheard of with real businesses.

Next, into the body of the message, we find mis-spellings and bad grammar throughout.  More underscores in "Dear-Values-Customer"?  Yes, please.  "Antivirues"?  Okay, enough on that.  Let's just check and see if we can find the origin.  Open the message source (this will depend on your mail client, you might need to open a browser window and search the Internet for "view email source" and the name of your client to find out how).

At the top of an e-mail source are what can be referred to as "headers".  There will be no empty lines in this area.  These headers are keys and values, separated by a colon, the key on the left.  When an e-mail is received by a server, that server is supposed to tack onto the leading front any source information such as "Received".  This means that if we find each of the "Received" headers as we scroll down, we are actually taking a look at the messages history and going back in time.  We want to know the origin, so lets scroll to the bottom of the headers, and then work our way back to the top.

You'll see all of the "Subject:" and "Bcc:" headers - these are what your mail client displays when you open a message.  Shortly above this is our first "Received:" header.

Received: from mail-sor-f41.google.com (mail-sor-f41.google.com. [209.85.220.41])
        by mx.google.com with SMTPS id j5sor2873717lfe.26.2021.08.29.18.18.32
        for <email@gmail.com>
        (Google Transport Security);
        Sun, 29 Aug 2021 18:18:33 -0700 (PDT)

What I am interested in is anything that is four numbers separated by dots (no spaces, and not more than four numbers).  Here, that is "209.85.220.41", and it's called an IP Address.

When you are doing this, if the IP addresses start with 192.168., or 172.16., or 10.0, or 127., these are called "private networks" - though they can give us an idea of what the networks are built like, they won't help us, so if your first Received: header contains an address like that, simply move to the next one.

In our case, the IP address is not an internal, or private network.  So, open your web browser and do an Internet search for that.  (If you have Linux, you can also simply run a "whois 209.85.220.41" and get results).

Well, that sucks.  That address is a giggle address (spelling is intentional).  It's one of the gmail.com addresses.  I know, we could have looked at the domain name for it in the "Received" header, but I wanted to go through the exercise.  Google USED to show the source for the e-mail, even if it was done via gmail.com's website and not an e-mail client.  Just for kicks and giggles, scan all of them.

So, what CAN we do?  Actually, not much with this one.  Let's look at the second one.

Bugger.  It's also from a gmail account.  Still, the spelling of the name is atrocious, the spelling and use of symbols and underscores in the subject is a fast red-flag to know this is not official.  In the body, we have the usual grammar errors, and capitalization issues that alert us that the sender is not a standard english speaker.  Remember, a big business will have additional people proof-reading their e-mails and templates.

Then, there is the killer.  They couldn't even spell the company name right that they were trying too poof.  They had "MAcfee" instead of "McAfee".  Unfortunately, this one also had a gmail IP address :

Received: from mail-sor-f65.google.com (mail-sor-f65.google.com. [209.85.220.65])
        by mx.google.com with SMTPS id h7sor653174ljc.46.2021.09.09.03.18.39
        for <email@gmail.com>
        (Google Transport Security);
        Thu, 09 Sep 2021 03:18:39 -0700 (PDT)

So, like the detectives when all of the toilets were stolen from Scotland Yard, we have nothing to go on.

Still, on a positive note, they left two phone numbers.

1  (747) 600-1278 
+1 640-900-2247

If you Internet-search those numbers, you'll see that they have a scam reputation.  Still, I am tempted to call them just to see.