

"This lathe can be made into a metal turning lathe by equipping it with the compound tool rest...
"... Important: Use only the slowest speed and take light cuts. (These slower speeds can be obtained by our Jackshaft, see Cat.)"That means to me the bed is rigid enough to work for what I need.
Oiling
Adjusting the Tailstock
Removing Tooling
Obtaining Parts
Summary
So I bit down and picked it up. I grabbed some stamped/cast part numbers, found the manual out there, and pulled as much info as I could. Here are some numbers I've been able to locate so far:
| Bed Gap: | 1 3/4" |
| Motor: | Original Dunlap 1750 RPM, 1/3 HP, Model 115.4624, 1/2" shaft |
| Turning Speeds: | 714, 1305, 2287, and 3952 RPM (smallest gear on motor pulley gives slowest speed) |
| Headstock Spindle: | 3/4", 16 TPI (threads per inch), or internal Morse Taper #1 |
| Tailstock Spindle: | Morse Taper #1 |
| Part Number for Tool Post Clamp: | L2-18 |
| Part number for Tailstock Housing: | L2-5A |
| Part number for Tailstock Clamp: | L2-7 |
| Part number for Tailstock Base: | L2-6A |
| Compound Tool Rest Parts | |
| Clamp: | L2-18 |
| Carriage: | L2-51 |
| Compound Rest Swivel: | 9-301 |
| Upper Swivel Slide: | L2-52 |
| Tool Post Slide: | L2-53 |
It appears to be in great shape for it's age (around 1942). It runs (well, ran, the motor just gave up the ghost - and I had to rebuild the motor to get it working again). Here are some quick photos.


When I cracked the top cover open, I found it had an indexed pulley in the headstock.

It's broken into 60 indexing holes, and has an indexing pin to stop the pulley from spinning. The manual listed the following indexing table :
| Divisions Desired | 1 | 2 | 3 | 4 | 5 | 6 | 10 | 12 | 15 | 20 | 30 | 60 |
|---|---|---|---|---|---|---|---|---|---|---|---|---|
| # of spaces | 60 | 30 | 20 | 15 | 12 | 10 | 6 | 5 | 4 | 3 | 2 | 1 |
| Degrees of Arc | 360 | 180 | 120 | 90 | 72 | 60 | 36 | 30 | 24 | 18 | 12 | 6 |
The manual also lists turning speeds (for wood) :
| Size Diameter of work | Roughing Cuts | General Finish Cuts | Fine Finish Cuts - Sanding |
|---|---|---|---|
| Up to 2" | 2,297 | 3,952 | 3,952 |
| 2" to 3" | 1,305 | 1,305 | 2,297 |
| 3" to 4" | 714 | 1,305 | 2,297 |
| 4" to 5" | 714 | 1,305 | 1,305 |
| 5" to 6" | 714 | 714 | 1,305 |
| 6" to 7" | 714 | 714 | 1,305 |
| 7" to 10" | 714 | 714 | 714 |
It rotates freely, the motor actually fired up for a while (it's the original motor, Dunlap 115V model #115.4624 1/3 HP with a 1/2" drive shaft), then it stopped working (arcing and sparking) and was then rebuilt, and seems to function fairly well.


First step - oil it!
I threw some oil into the tailstock, in the following way. I adjusted the ram (the thing the live center or chucks press into) all the way out, and it slid right on out. I throw some oil on it, and worked it into the tailstock and out of it completely numerous times. Then, while I had it out, I threw some oil into the back end (where the handle connects to the ram), and worked that a few times. If it had a bolt, I removed it and oiled it. It got to a point that it was working fairly nicely.

I filled the oil cups on the headstock, and put on some turns by hand, just because I needed to ensure the front oil cups are working, and not sealed with gunk before I fire it up for any real use. I grabbed an oil rag and wiped the headstock down, squirted some oil against the spindle bushings while turning it and sliding it back and forth in the headstock just to get some oil penetration.
Once I vetted that the level of oil in the cups had dropped, I filled the cups again and fired it up. I ran it for a few seconds before it stopped turning, and I simply started to go crazy and shut it off.
Then I realized the spindle had a wheel on it that was too tight. I loosened that, and fired it back up. Success!
Second step - see about the misaligned tailstock!
So, I started poking around the tailstock to see about the misalignment :
 |
| Tailstock toward the bottom of the picture, headstock to the top, from above the lathe - quite a difference |
I found at the bottom what looked like threaded rod with a slot cut into it (circled in red) :
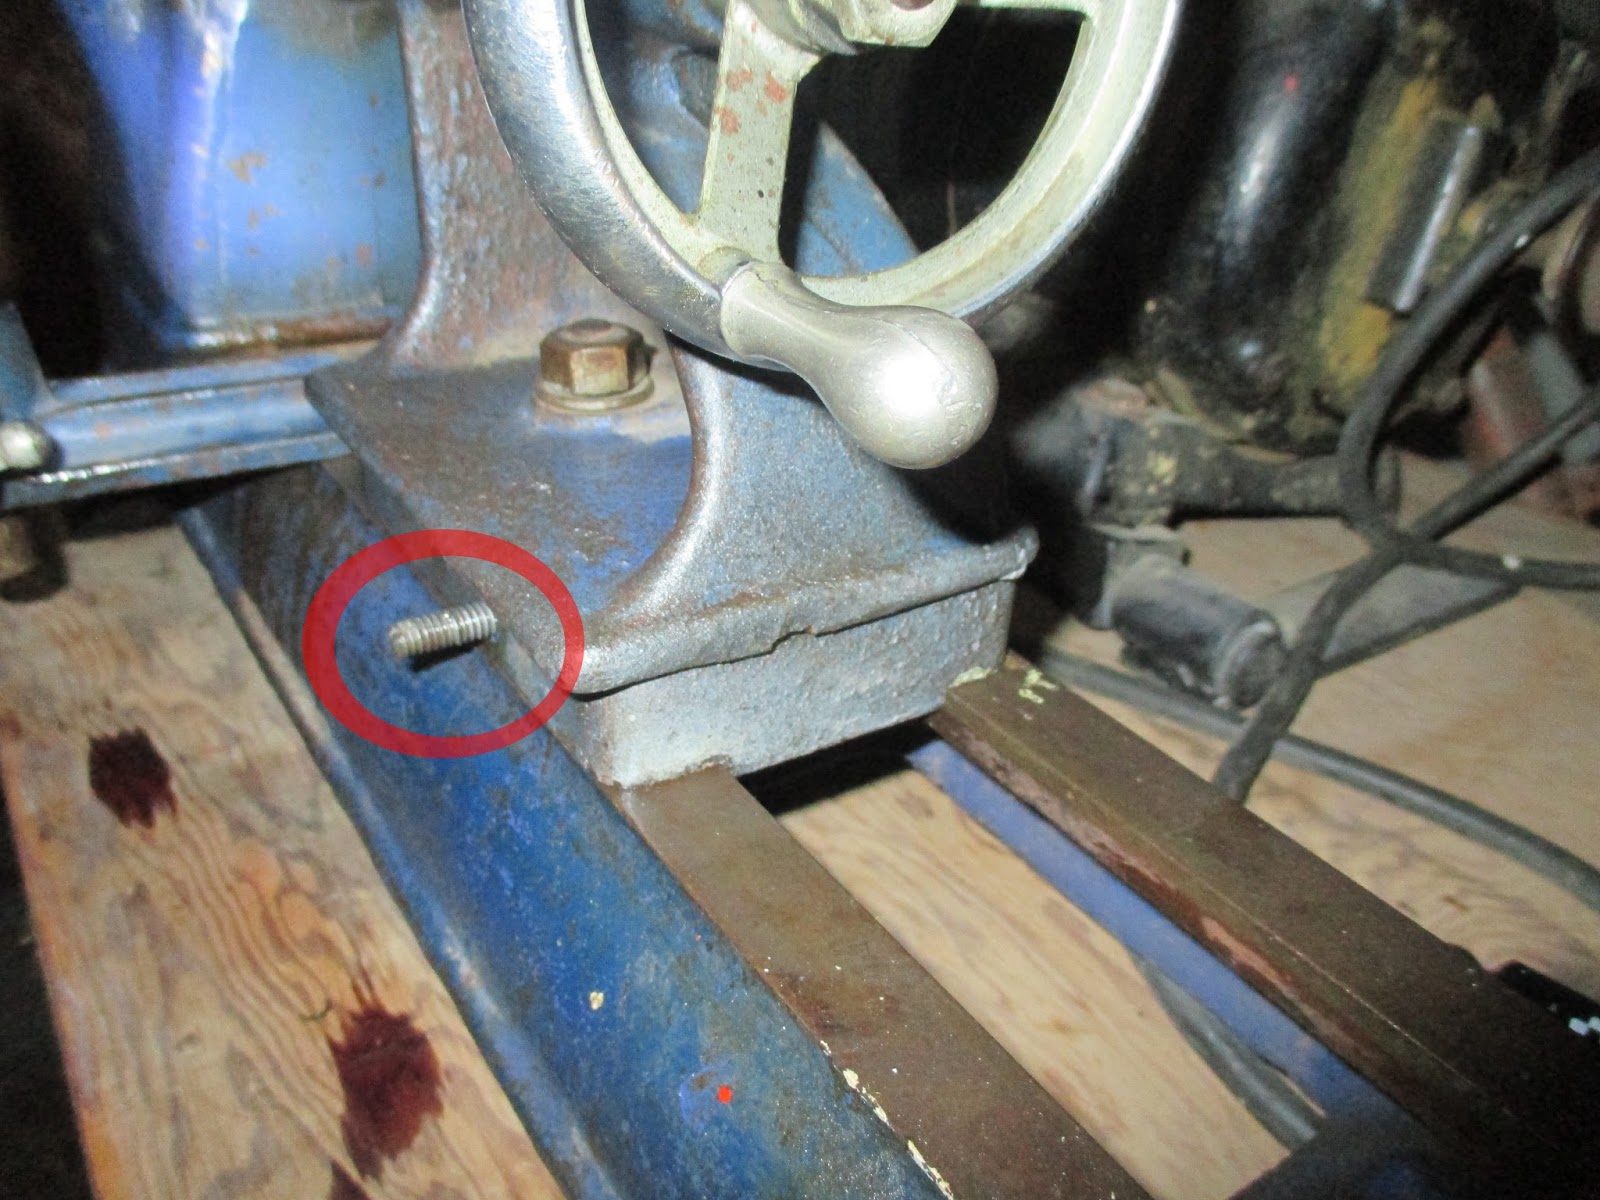
Pulling off the tailstock from the ways, I found that they were completely separate rods, not a single one :

I realized that they are two separate rods, one on each side, and they will push against an alignment block on the tailstock. Yes, that is the tailstock base part number cast, L2-6A. I greased up the threaded rods to get them to turn, cleaned them out, reassembled, and promptly had the tailstock lined up with the headstock. Just as an FYI, here's the tailstock housing part number stamp :

Removing the Tooling :
The tooling is removed like this. Because the spindle is hollow (I might have to turn a solid spindle to be used in metal work just to make sure it will hold the pressures), you need a long rod (not threaded - you don't to mar the inside of the spindle). Insert this from the back end of the spindle by hand until it travels over half way through the spindle and makes contact with the end of the tooling. Grab your hammer, and give it a light tap or two, until the tooling pops loose.

The tailstock tooling is a bit (that's still not very punny) easier to deal with. Initially, I thought the tailstock ram simply did not move all the way into the tailstock - I still had about 3/8" left of ram when it "bottomed out". After watching one youtube video that was using a modern lathe (who still makes a lathe with the hard-to-find #1 Morse Taper/MT1 bits?), I had the thought that it might be bottoming out on the back side of the tooling. I retracted the ram until it bottomed out, then put some cranking onto the hand wheel, and it popped right out. Here's the tailstock photo, in which you can see how far the ram was retracting before we popped the tooling out :
 |
| Tooling installed, you can see the ram with two different styles, one wet with oil, the other dry. This is the line where it would stop on the tooling. |
After popping out the tooling, I could do a little more cleaning. I found a crack, and I had to have it welded, and then I needed to check it for straightness (flatness) on the bed ways for warping.
Third - Obtain Parts
At this point, I have a fully operational lathe that I can't use. Yes, it works, but not very well, since the headstock only has an MT1 center spur shank in it, and the tailstock has a dead center cup (dead, meaning it isn't supposed to turn). I can't put any stock between (because the tailstock doesn't spin), so I'm stuck until I track down some parts. Here's what I'd like (order of importance because of usefulness) :
Live Center for the tailstock- this would allow me to turn something on this thing. I bought one.- Chuck for the headstock - this would allow me to throw a pen mandrel on this and start turning pens. I don't want an MT1 (or Morse Taper #1) chuck, I want a 3/4" 16 TPI 4 jaw chuck and backplate. It should be a machinist chuck, as the morse taper chuck is a separate item on my list. It COULD be a 1"-10TPI chuck with an adapter. I'll see what I can find.
Live Chuck for the tailstock- This would prevent me from putting too much stress on a pen mandrel. Speaking with a machinist in the neighborhood, I was instructed that this would be pointless - he never uses one - and that a good live center would be better. So, I scratched this one off my list.Dead Chuck (MT1, or Morse Taper #1) for the tailstock- something to put a drill bit in (yes, the bit won't turn) so that the work will turn around the bit, ensuring a perfectly centered hole. This can also be jammed into the headstock for the pen turning. I couldn't find one, so I bought a morse taper arbor and a matching chuck, assembled them, and viola, I have one now.Compound Slide and Tool Post- I ultimately want to do some machining. To do this, I need parts L2-51, L2-52, L2-53, and another L2-18. If anyone has these parts lying around, please let me know. Well, I just barely found one listed on eBay. I know it's rare, so when I actually saw it, I quickly took that plunge.- A variable speed DC motor - that AC motor has got to go, sure, it works well, but it doesn't have enough torque for what I want to eventually do with it. Note, this might have to be bumped up in priority - the original AC motor gave out during a pen turning test. I did rebuild the motor because I wasn't ready to spend $300-$800 on a replacement, so it's not a requirement, because it is running. Before I start using it to machine metal, I need this - to turn the speed WAY down. The lowest speed on the lathe is 714 RPM, and that's way too high for machining metal.
- An RPM indicator - to get really effective, if you have a variable speed motor, this is the only sure way to know how fast you are spinning. Lots of DIY stuff around here, I might try this route.
A face plate- if I ever turn bowls, I'd need one. I probably won't turn any bowls, but the lathe originally came with one, so I ought to pick one up. I found a cheap one online, and installed it, but then took it off and haven't used it since.
Summary
This is a fairly nice lathe, considering it's age (73 years). It's real cast iron, not the new white metal (pot metal/zinc alloy), fairly rigid, and has been used to turn a pen already, and has done the roughing on a second pen, as well as cut down a 2"x4" chunk of wood for a taper setting tool. It's been a great introduction to the lathe tools, and will provide a great base for increasing capabilities!
No comments:
Post a Comment