

My spouses' brother bought a house a few years back. He has five kids, and they sit around a small, round table from the 70's - one of those awkward tables that wobble and have edges coming off. He needs a new table. I signed up for Pinterest explicitly to get "snapshots" of tables for his daughters to run through and give feedback on - well, because they are all Pinterest people. The results came back as a "farmhouse" table top like this :

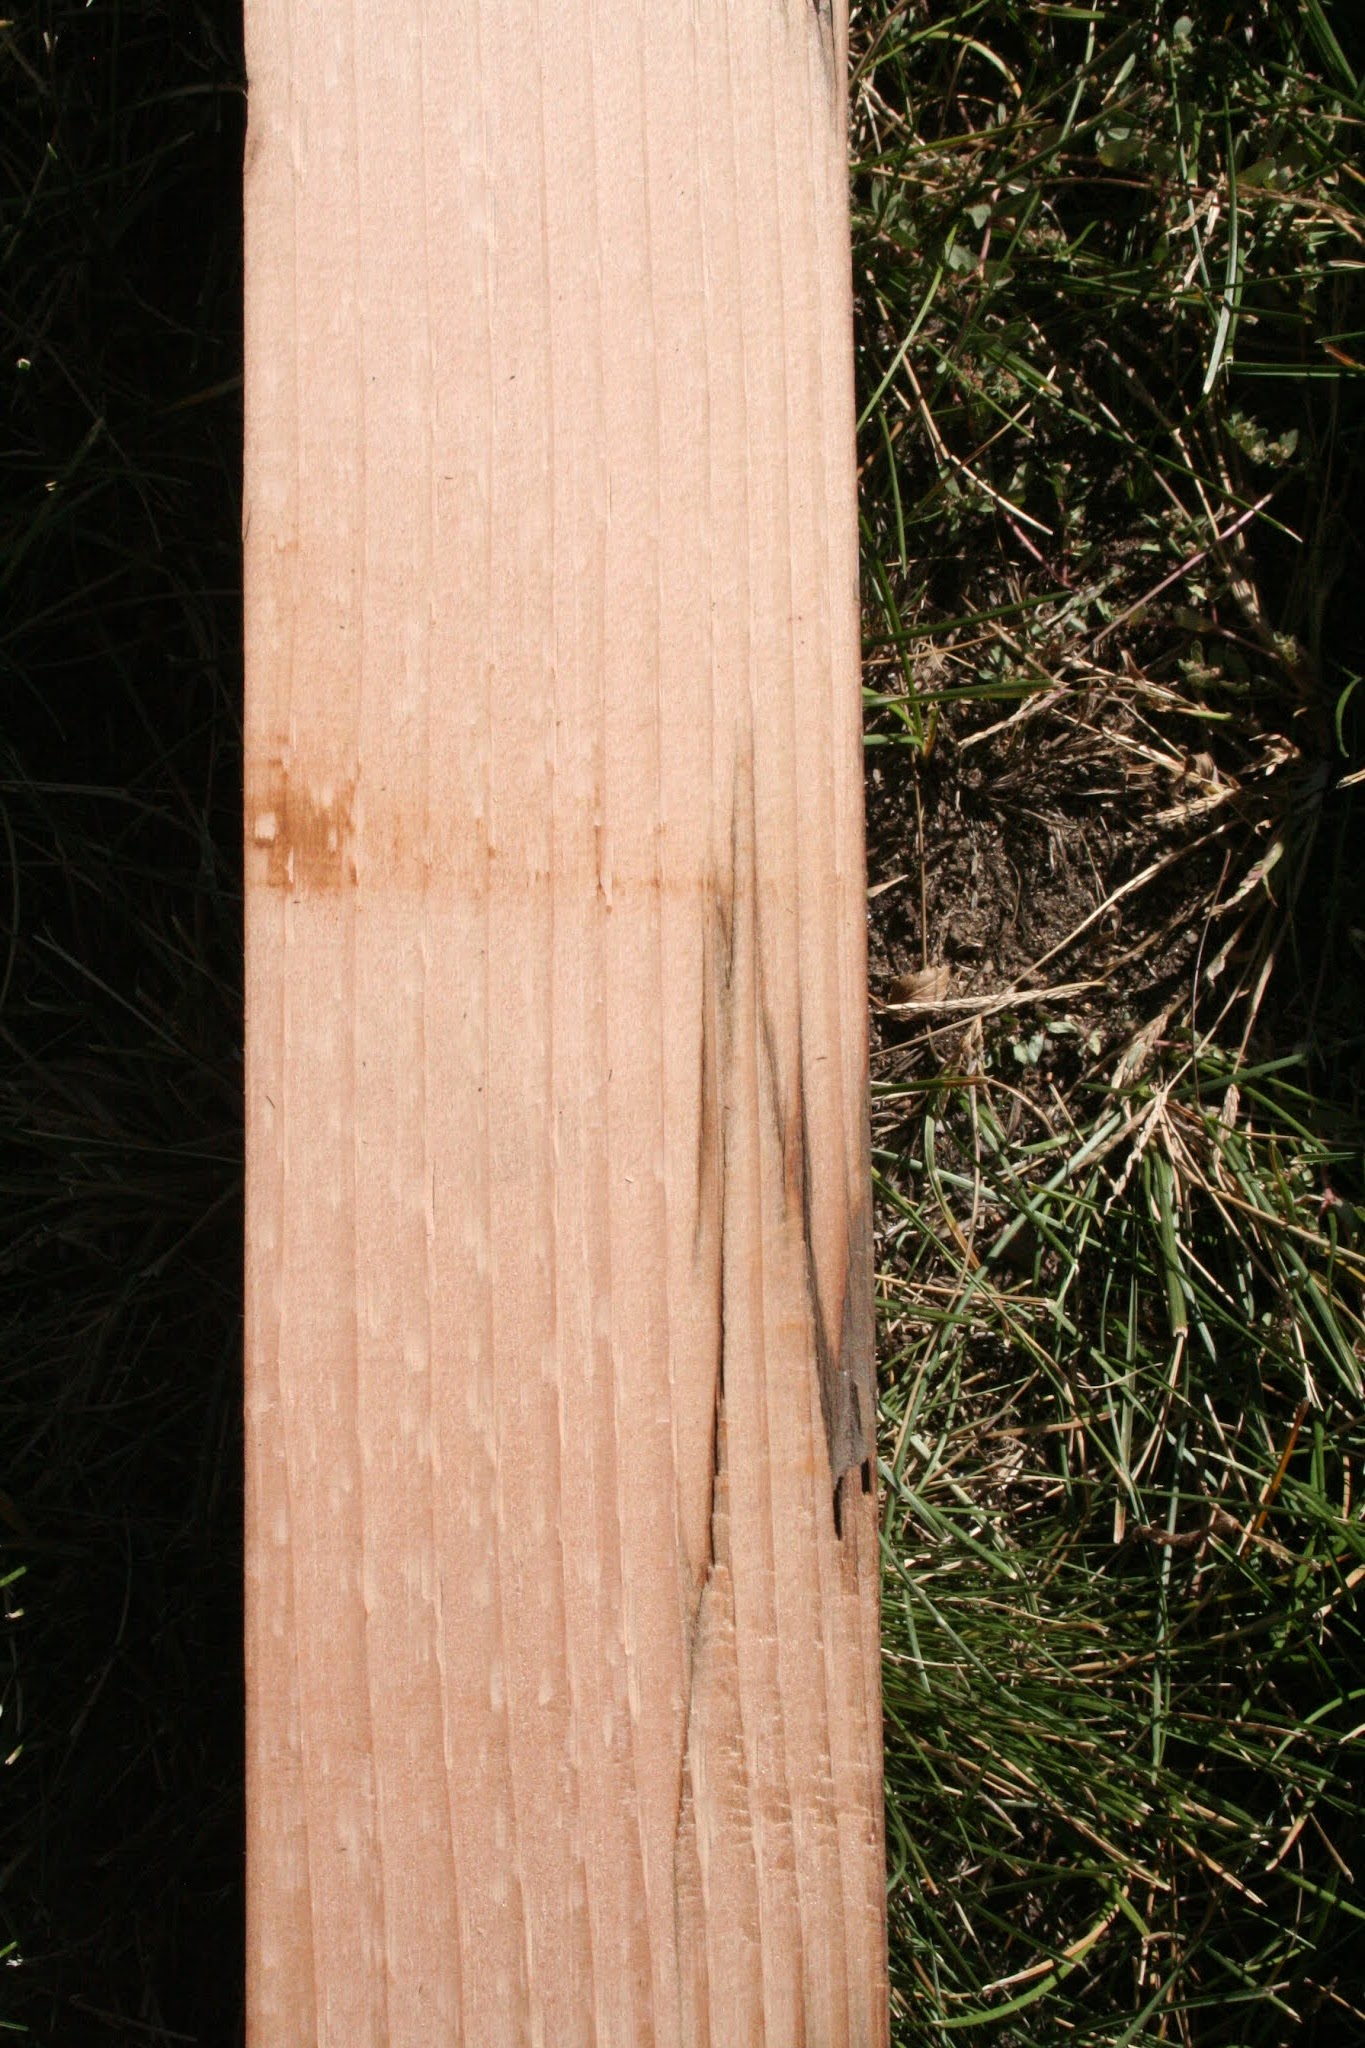
Note that this is not an actual farmhouse table design. Those have four legs at each corner, not tied together. The base in this case is two sets of "X" beams. But, this is what I need to start working on. With the COVID panic and quarantining going on right now, the price of lumber went through the roof (probably because they couldn't get to the saw mills to cut the boards). I found someone who had a big pile of wood in his back yard that was used to haul pipe - and that wood has been sitting there for a long time. That means the wood has already dried out. There are numerous splits in the wood, which means I'll have to do some epoxy filling of different boards to make it more stable and give some good results. Another issue is that I'm not yet sure what families of wood I even have. I tried to grab all of the straightest, squarish boards that were light. I did grab some other boards - I believe those are hardwoods - they are fairly heavy, and they've dried out. I just hope they aren't walnut.


I know I don't need 20 of these things. But, at $3 per board, I could not resist picking up some extras, just in case.
First step was running through and removing nails and staples. For this, I went out and bought a metal detector from Harbor Freight (the hand-wand thing you'd see at an airport security if you forget that you have a large pair of pliers still in your pocket that you forgot about. I removed all of the metal pieces, and made sure the boards checked out clean. With a clean, metal-free group of boards, the steps are to get good, usable lumber out of these.


The next task was to get a first side that was planer, e.g. straight and not warped. I used the jointer for this, since it had a 6" width capacity, and some of the boards were 6" wide. I'm using the jointer and not the planer, because the planer will not "flatten" the edge - it will end up parallel to the other edge, which will have curved and warped from weathering.


I found that I was doing this like a machinist doing a scraping job - I'd run it through and skim just a little bit off, and check that it was imprinting the flat surface of the jointer onto the board. Wash, rinse, and repeat until I had the board completely clean and flat.


I was a little surprised. I thought it would all be white pine, but it turned out to be a mix. One board was yellow pine, four were white pine, and eight were a reddish color that I was not expecting. It smelled similar to pine, but did not smell like Cedar, so I'm assuming it's a redwood. I know that is odd stuff to use in a piece of furniture, but I think it will do. It's just odd to find redwood at all.
With those beams done on one side, I needed an adjacent side done that was square. So, I had to use the jointer for the second side, too.


I used a machinists square to make sure I had the second side square to the other. Once it was square, I could focus on getting it flat with no warping. This 90-degree corner with flat sides will give me enough to feed through the band saw into 1 1/8" boards (that I can feed through a planer to get my table top boards).
So, off to the band saw. I am aiming for just under 1" thickness on the table top. I set the fence for 1", and ran the first edge through (since it had a planer side already, I didn't need to feed that side through the planer at a later time). I ran each board through, and took the first faces off. I reset the fence to just over 1", hoping to keep it as thin as possible and get a few more boards out of the beams, and ran each piece through until I had the thin strips left over. These strips are going to be planed and glued to get some additional boards that might be needed for an extension. But, the re-sawing is now complete, so I can put the bandsaw away.


My next task was to plane the boards down to the same size. Since the first cuts were just barely under an inch thick, I kept running those through along with everything until all the boards were the same size. From the 7 beams I used, I ended up with 16 boards, at 7/8" thick.


Yeah, you can see the saw blade burn marks on there. With the boards parallel, I could then run them through the jointer again to get good, square edges on that final edge.

The boards were dimensionally accurate at this point in everything except for the length, so I was ready to glue them up. I needed a base that was as flat as I could get it to prop the table top onto. I had a few beams I'd run through the jointer earlier. I arranged these all parallel to each other (the table top boards would be set perpendicular to these. I needed to get them not just parallel to each other, but also planer. This is so that when I glue up the table top on them, the odds are better that I can end up with an actual flat table top. I used door alignment wedges to prop up these beams, and an old trick to get them planer. I tied strings from each corner, so I had parallel strings on the sides, as well as a cross in the middle.


It was then that I could use the wedges to lift the boards until the crossed strings were right on (without bending). Then, I could lift the middle beams with the wedges until the strings and the beams met. At this point, the beams are all planer, and that is what I need. I grabbed some plastic sheeting (I don't want to glue the table top to the beams), and covered the beams.

I took the dimensionally-correct boards and selected the best surfaces, as well as which ends. Yes, at this point, I'm selecting the actual table top. Once defined, I could then rotate the boards all together (I actually did a spatial rotation - 3D design has its benefits. The top was set on the plastic beams with the top-side down - so that I have a better chance at having a flat table top when the glue up is complete.

In the previous picture, you can see the bottom side of the boards. These are ready to be glued up. I grabbed my cast iron weights to keep it flat while it dries, and brought out the carpenters square to make sure I was close enough. I waited until I had time, and then threw some glue down (I think I'm going to need more before this project is done).


Now, to wait for it to dry. I really regret that the table top isn't perfectly flat. Some of the boards are slightly out of alignment, and that means I'm going to do a LOT of sanding. But, this should give me MOST of the table top - the end grain is showing, and I need that corrected. So, I'm going to miter the outside pieces so that I don't have end grain, and then I will glue them on. This is going to give me another excuse for a new tool, too - I need a hand-held router. For some odd reason, I don't trust the other router to round over miter joints when they have yet to be glued together.


Once dried, I could then cut it square. I lined up the carpenters' square along one edge, flipped it, and... the lines didn't line up? What?
I am attributing it to a little warpage in the boards. Oh, well, as long as I can cut it on a straight line, as square as possible, it should do the trick, right?
Anyway, I cut it at the other end, which was much more square. Then, I measured back to the other end (it's the far side in the last picture above) the same distance, and used a chalk line between the two points. While it certainly looked good, I also measured from corner to the new hypothetical-corner (diagonally) on each side, and when I got the same numbers, it was as square as possible. So, I cut it.

The table is currently 40 3/4" x 74 1/4" . I grabbed a #33 hand planer and knocked the edges down to even out the top, and sanded it down.


Then, I glued on some end pieces to reduce the end grain, and glued on the side panels. Before I could glue on the end pieces, I had to run a saw along both sides - one end was 40 1/2", and the other end was 39 3/8". Once the sides were parallel, the final side boards could be glued in place.

At this point, the boards for the table top is in place. Since it now measures 90"x45", I was "done" with the top surface. However, it was starting to feel flimsy, and I needed this to be a stable table. It was 3/4" thick. I needed to add some support underneath, so I ripped some of the left-over boards to get a skirt around the bottom surface. These were mitered at the corners to reduce the exposed end-grain.


Now that the outside edge of the top is now 1.75" thick, I needed to back up the inside, bottom surface. Before I did that, I used a router and rounded over the inside edge, since I wanted the plywood to be inset from that. The 1/4" round over meant I needed a 5/8" sheet of plywood, but all of you wood workers know that plywood doesn't come in 5/8". (Think like "2x4's" - the closest I could get without going over was 19/32".)

I dropped the plywood in after slathering two and a half bottles of wood glue in, and let it set up. You can see a picture of this plywood inset in the pictures below where I position the table for the first epoxy pours (in the garage - it was starting to get cold and rain).
Speaking of repositioning the table in the garage - I went to move this thing, and it was way too unwieldy. I essentially used black plastic sheets to protect carpets, floors, and the table itself, and dragged it through the house and into the garage. I stood it up on end (because I needed to get end-grain corners first), weighed the thing, and then clamped it to the work bench to keep it vertical while the epoxy cured. This thing weighted 112 lbs, or just over 50Kg for you metric-folks.


I used painters' tape to create a chamber around the edge for the epoxy, and then poured one end. I let it set for a few days (the epoxy is a 72-hour-cure time), and flipped the table end-to-end, and poured the other side. I let it cure like that again, and then moved the table back to the covered patio. I didn't have the inside real estate to pour the top cracks - so I was forced to move back.
It was on the patio that I started the pours into the cracks and knots (any hole in the wood). The kids swung by and wanted me to pound in the screw holes that would later be filled, so I did that while I was pouring.


This was the time-consuming task. It was a process of fill a little epoxy in a cup with the dye, pour it into the crack, wait for an hour for it to start to set up, and repeat. There were a lot of repeats for areas where the table top and the plywood had a gap between them, and I know I ended up filling those cavities. That's kinda what I wanted - it should lend a stability where I might not have otherwise had it. Sure, it likely did not need it, but I wanted it to be a solid table.
While it was curing, I needed some additional math. Let me tell you, if you are using angled legs like this, you need to refresh your memory on trigonometry. You are given a height, and an over-all width, and you have to calculate the angles at which the cross board meets the width you need - and that includes the angular width of the board. I shot for about 30" wide - that will leave 7" of leg room for people to maneuver their legs around these legs.

Once I had it filled and it had time to cure, I sanded it down. This was a LOT of sanding - to get through all of the stained wood that had extra epoxy on it. I sanded it down far enough that I know there are some additional voids that need to be filled, but over all, this is looking phenomenal.


I'm only doing the first sanding now, because the rest will be done once the legs are attached (so I can go straight to the finish). The copper color of epoxy dye looked good before I sanded it. After I sanded it, I started to worry - the epoxy was looking blackish and purpleish. It hit me later that night that this was in part due to me using purple-colored sanding pads.
Once the initial, 40-grit sanding was completed, I rounded over the corners (not the sides, just the corners), and then flipped the table so I can fill the voids on the skirt. I wanted to use epoxy, but this has gone on for long enough that I'm changing gears and I'm going to use wood glue and saw dust as a filler. It should set up in 1/3 of the time, and let me start sanding the bottom side.


Once the bottom side was sanded, I applied two coats of polyurethane. It's the bottom, so I'm not worried about durability. I used a brush (which was a mistake), so it will be a sanding down of the coat to get a smooth finish, and I'll call the bottom of the table complete.
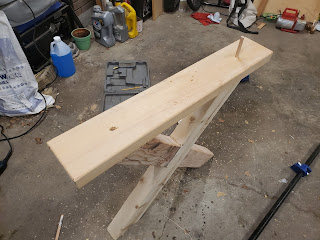
While that was curing, I started on the legs. The beams are 4"x3". I planed them to dimension :

I cut them to the mathematically-determined angles, and also notched them with a skill saw (it was a better blade than my compound mitre). I glued them up, and let the glue set :

With the legs "shaped", I could set about stabilizing the wood with epoxy fills. I had six separate series of pours, with a "series" being a pour, and a re-pour as the epoxy settled into the cracks and left voids needing to be filled again. Every single beam side had to be stabilized (hence, six sides) :

There's a 72-hour wait time for the epoxy to completely set up and cure. Once complete, the sanding can commence on both the cross-braced legs, along with the bottom "foot", with routing the corners to soften it.
After SO many epoxy pours and long waits of curing, the legs were ready to be sanded. It was at this point I realized my tendency to the machinist world - I essentially made the legs parallel in height, and then "scraped" them into uniformity with a straight edge and a pencil to identify the high spots.

I ran through this quickly, and this time, I went through all of the "not as critical" grits, from 40 to 800. I figure that should be good enough for the legs that are going to get covered. It was at this point I needed to drill the base feet and get a corresponding hole in the bottom of the legs. After a few minutes of figuring out the best arrangement, it became a matter of marking holes and then drilling. I (once again) relied on a technique there I marked the holes, drilled a short 3/16" hole into the legs, and an associated through-hole on the feet, then flipped the feet onto the legs and use some 3/16" stainless rod as an "alignment pin". This allowed me to then sit on the legs/feet upside down (I'm fat enough, it was like a clamp), remove a pin, and drill it out with a 1/2" bit all the way into the legs for the 1/2" dowel. I can then install the dowel, and repeat on the other leg. This forced the dowel holes to line up, meaning this was going to fit together like a glove.


Once that was done, I could glue the surfaces and holes, and then drive the dowels into the feet (just proud of where they'd enter the legs) so I could match them up, and then hit the dowels to drive them deeper into the legs for a good, solid fit. I used pipe clamps to really bind them together for the perfect glue up, and I switched the one set over to the regular pump clamps just to keep pressure on them so I could use the pipe clamps on the other to bind it.


The legs were then left to dry (e.g. the glue is curing). After that, I took the time to cover the car, and protect it.

Once the legs are dry, I can drill out for the table top holes, and then spray polyurethane to finish the legs. I'm actually going to use a 1/4" rod and my barrel trimmers for turning pens to countersink for the bolt heads. I need a 3/4" counter bore to fit the washer and also a socket for the bolt head.
To do this, I started the holes from the table-top-side (top, drilling down) with a regular 1/4" drill bit. I then used a long "installer" 1/4" drill bit ( it is 12" long) to finish the holes, and then, I used the barrel trimmer from the pen turning tools on the bottom (set right above the flutes on the drill). I could have used a 1/4" steel rod for that, but I had the drill bit ready to rumble. The other end was connected to the drill, and the drill bit could be the guide to make sure the counter bore was concentric. I then ran the drill in reverse and pulled on it instead of pushing like normal.


I needed to measure the counter bores - so I used the square to determine the length when I had it deep enough, and then I could use a caliper to measure the distance between the barrel trimmer and the top. Some of the positions didn't quite line up, which is fine. It meant that a depth to cover the bolt head resulted in differing lengths of potential bolts. I marked them out, because I need to bring the counter bore back out and get them to the same lengths so I don't need custom bolts for each spot. (I'm thinking if someone ever moves the table, and removes those bolts, they'd either have to keep them in place, or I just make them all interchangeable.)


I ordered some bolts that are long - and that is going to be just fine. They are not fully threaded, which is also perfect. I will shorten the bolts to the specific length I need, and then I'll thread what is needed to fully mate with the insert.
The stretcher between the legs will be a 60" piece of galvanized steel pipe, and two flanges. I sanded the pipe enough to get through some of the galvanization, and then put an almost covering of black paint. Once that cured, I sanded in areas again, and put a coat of copper metallic paint on it - again, an "almost" coat. It left silver pipe, black, and then copper - that pipe looked fairly beaten up, which is what I wanted. I painted the flanges with the same copper metallic paint. It's not mirror finish - in fact, it's barely shiny in any capacity. I don't need it to be polished - I want distressed. Anyway, I used a machinists' vee block on a jack to keep the bar level on each foot. I did not move the jack, I moved the feet/legs just to make sure it was all kept at exactly the same height.


It was at this point that a wind rose up as a snow storm set in. My wonderful wife helped me move the table inside and set it on the legs just to keep moisture from causing warp (or other problems). We didn't have anywhere we could really put it, so it's sitting in the living room. In this stage, it is the most like a table that I have seen it - the top and the legs are finally together.

This is getting really close to completion. I attempted to knock over the table a few times to check the stability, and I don't like it. I've grabbed a few shelf brackets to make it a bit more solid, but that means four screws into the table top (on the bottom side, mind you). It grates on me, having 16 screws in this table (four in each flange, and then the four in the shelf brackets), but I want this to be a good, solid table. I will install the brackets as a last step.
I needed to adjust the counterbore depths so that it didn't matter where the bolts went and to which hole. This was done using note of the drill bit length along with the 1" space taken up by the barrel trimmer. I'd measure from the bottom to make sure the trimmer didn't move, then measure the top, and subtract all the numbers from 12. That would give me the precise length of the hole. They were all made to 3.75" for consistency. Depth varied in order to achieve that, because angles weren't quite perfect on the legs.
Then I took the table and married it to the legs/feet.

With the table fully bolted together, it was a little more stable. Still, I'm adding the shelf brackets. Anyway, I moved the table outside (it's 13 degrees), and sanded to 1200 grit, plus rounded the topside edges. I wiped it down (get rid of the saw dust), and moved it back inside. I did a damp-rag wipe down to see how it will potentially look.


It was at this time that I knew I had a problem.
Because of the cold, I could not do the finish coat outdoors. I grabbed two heaters and carried them into the garage, and fired them up. I also ran comparisons on heat differences in the garage vs. outdoors in order to determine if I could do the top coat there.
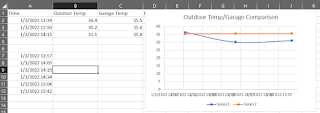 |
| Outdoor vs. Indoor Temperature Comparison |
 |
| How Quickly The Garage Heated, 1x Heater |
It turns out that I can't. The two heater method immediately blew the fuse. The one heater never got it up to 50 degrees that poly likes to have fast enough to keep it there for hours. Because I couldn't do this outside or in the garage, that meant I'd have to beg for forgiveness from my wife and hand brush it.... in the living room. Unfortunately, now I've been given the task of an absolute cleaning - ceilings to floors. But, it turned out really nicely.

A short video of the table (with that beautiful douglass fir heartwood) :
Frankly, I want this table. If he turns it down, I'm going to turn this into a new desk. Last task is to deliver this, and see if I can talk him into letting me keep it.
No comments:
Post a Comment