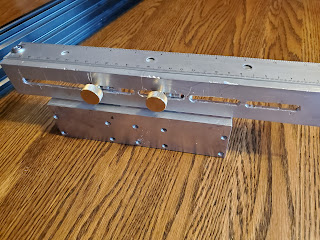
Someone asked if I could cut them some boards on the bandsaw. I went to check it out, and the blade was dull. Plus, my old wood fence for the bandsaw was warped. And, when setting up the fence, I got tired of the mitre-to-board-via-c-clamp setup that I had.
Always start with a plan. I used some machinist gauge pins to determine the slots in the mitre gauge, and the distance between the holes. This gave me both the distance between the two holes, and the height from the base of the mitre gauge. Rummaging through my cut-off/drop stock, I found a bar of aluminum that would come to the height of the top of the mitre gauge, and a small, thinner bar I could cut in half to be some risers. The mitre bar was twice as long as it needed to be, but I did not cut it - I thought this would be a good opportunity to make this attachment adjustable. I also divided the twice-length into thirds for the risers, and marked them all out for drilling.
I planned on #10-32 for assembly, because the slots in the mitre gauge would take that size (nothing bigger). The riser bar had two holes in it already at the ends, and that forced me to switch that side from a #10-32 to a 1/4"-20 on those particular holes. I had thumb screws that size (in brass), so it was a natural fit to drill those for a 1/4"-20 and tap them.
A lot of drilling, tapping, and counter sinking later, I had the basic assembly. I lost a few pictures in the mix, so I don't have photos of the simple assembly at this stage. I needed some thumb screws to attach the assembly to the mitre gauge. I ordered some #10-32 thumb screws in stainless steel that were 1" in length.
I used a piece of extruded, 90-degree aluminum, and drilled holes for a slot (I didn't want to break out the mill - I had too many wood tools where I'd have to go and clean up was off-putting). The task of marking the holes took the longest. It wasn't a single slot, and it was designed to allow overlap on the risers so that I could hit any position and length.
Once the slot holes were drilled, I used a file on the slots. Being a soft aluminum, this went MUCH faster than the drilling. At this point, the basic assembly was complete, but I needed a ruler. A quick trip to the craft store ended with me having a 12" aluminum ruler that had a plastic "handle" on it. I used a heat gun and softened the plastic enough I just popped it out of the ruler. I then marked the holes from the ruler to my angle-aluminum, and drilled and tapped the angle (1/8" thick, #8-32 with some machines screw washers). I had a big pile of parts.
This was assembled into the final assembly.
While here, I took two 25mmx75mm aluminum extrusions and cut them down to size. I added angle blocks to lock them together into a bandsaw fence. After checking for squareness, I cussed a few times because it was 0.035" out of square over 75mm - or 1/32" over 3". Sorry for the mixed metrology there.
I cut a few 0.012" shims and stuffed them into one end on the angle brackets, and had it fully square. Phew!
I ran both out to the bandsaw to check the fit. The attachment dropped into the mitre gauge slots perfectly, andI ran a few tests. It worked out perfectly!
Here's how it works.
- Clamp the device clamped to the mitre gauge.
- Position the ruler near the saw blade.
- Loosen the brass thumb screws holding the ruler in position, and slide until the desired depth of cut is obtained, and lock the thumbscrews to keep the ruler in position.
- Shift the mitre gauge to one end of the bandsaw, and slide the fence up to the ruler end. Lightly lock that end of the fence down.
- Shift the mitre gauge to the opposite end of the band saw table, and repeat the sliding of the fence against the rulers, and lightly lock it down.
- Once more, do the opposite end that we've done already, just to make sure.
- Lock the fence down.
- Remove the miter gauge (or the attachment if you are using the mitre gauge itself for your cuts).
Then, you are set up, and ready to go.
Now, once I get time to do some re-sawing, I'm ready.


No comments:
Post a Comment