Friday, September 12, 2014

CentOS 7 - xscreensaver

I really hate this Gnome interface - badly.  It requires so much clicky-clacky/mouse-moving work that I instantly feel like I'm in Microsoft Windows again.  I prefer a nice, simple Window Manager that is simply that - a window manager.

I have a laptop that I have installed CentOS 7 to - after completely forgetting with a desktop installation - that doesn't have a viable screen saver (unless I choose to go with that abomination called "Gnome").  See, I can't deal with Gnome.  I tried KDE for a week, and half of the time, I couldn't unlock the KDE/plasma screen because it never presented the unlock on it.  I realized that CentOS was not going to make a good desktop/laptop operating system unless I could get to a decent Window Manager and screen saver.

So, I did what every intelligent, awesome, amazing, and brilliant individual would do.  I went down the rabbit hole.  Seriously, I should have taken the blue pill and pretended that Gnome was just awesome - but I don't think I could get beyond comparing it to slicing my wrists and doing pushups in salt water with a hint of lemon juice in it.  I grabbed Xfce (nice - this one came in packages from the Fedora Project epel repository).  However, the EPEL Fedora Project repository still did not have xscreensaver.  That's a serious risk to me.  The last thing I wanted was someone coming by, finding the laptop unlocked, and me returning to find Justin Beiber as my wall paper.

So, I knew I had to compile xscreensaver from scratch.  I ran out and downloaded it from http://www.jwz.org/xscreensaver/download.html and extracted it.  I found a couple of missing packages (aside from the development packages I'd installed previously), and found those in yum :
    yum --enablerepo=base --enablerepo=updates --enablerepo=extras --enablerepo=epel --enablerepo=rpmforge install xorg-x11-server-devel.x86_64 libXt-devel libXpm-devel motif-devel
    
Then..., I tried to compile it :
    make distclean
    ./configure --with-motif
    make
    
I kept running into undefined functions for pthread_join and pthread_create, and thought I was missing a library - but I wasn't.  Down that rabbit hole, I realized I had to patch it.  I tracked down (from the error message) that it was trying to assemble the bsod screensaver and getting those functions, so I opened up the Makefile and started checking it to see how the -pthread was being passed.  After tracking it down, I created the following patch :
    diff -rupN xscreensaver-5.30-base/hacks/Makefile.in xscreensaver-5.30/hacks/Makefile.in
    --- xscreensaver-5.30-base/hacks/Makefile.in    2014-09-11 11:07:53.000000000 -0600
    +++ xscreensaver-5.30/hacks/Makefile.in 2014-09-12 09:48:05.017172709 -0600
    @@ -671,7 +671,7 @@ truchet:     truchet.o      $(HACK_OBJS) $(COL)
            $(CC_HACK) -o $@ $@.o   $(HACK_OBJS) $(COL) $(HACK_LIBS)
     
     bsod:          bsod.o          $(HACK_OBJS) $(GRAB) $(APPLE2) $(XPM)
    -       $(CC_HACK) -o $@ $@.o   $(HACK_OBJS) $(GRAB) $(APPLE2) $(XPM) $(XPM_LIBS)
    +       $(CC_HACK) -o $@ $@.o   $(HACK_OBJS) $(GRAB) $(APPLE2) $(XPM) $(XPM_LIBS) $(THRL)
     
     apple2:                apple2.o apple2-main.o  $(HACK_OBJS) $(ATV) $(GRAB) $(TEXT)
            $(CC_HACK) -o $@ $@.o   apple2-main.o $(HACK_OBJS) $(ATV) $(GRAB) $(TEXT) $(XPM_LIBS) $(TEXT_LIBS) $(THRL)
    
Simply put - the bsod compile instructions missed having the THRL (pthread library) environment variable passed to it.  That was the ONLY patching I had to do.  It still didn't compile because of the xscreensaver-demo until I symlinked the following Directory :

 cd /usr/include/
 ln -s gdk-pixbuf-2.0 gdk-pixbuf

Compiled just fine!


Wednesday, September 3, 2014

Paint Color Matching

I have good news and I have bad news.  First, with both door panels in, a good days worth of work could finish off the interior of the car.  With that in mind, it's time to start looking for a painter for the headlight units.

I called up some paint supply people, and got a recommendation - Larry at Vision Body & Paint, 11265 S 1300 W, South Jordan, UT (801-755-2084).  We talked for a little bit, and (since the paint was done with a gold pearl) now I have a good plan of action.

The color code I had last time was PPG Shimmering Shamrock, 908632 (UPDATE: I'm dyslexic, the code turned out to actually be 908362) 2-coat system.  Calling the supplier again (KC Auto Paint, 1600 S Redwood Road), and they said over the phone that it wasn't green - it was blue.  So now, I've got to run to the supplier with the part again, see if they can match it, grab a pint of stuff (they can mix the color for me), and run it over to the painter to let him try it out.  I think this one trip will cost me $300, but here we go!

UPDATE - I picked up a half pint of base color and a half pint of pearl, and delivered it to a new paint shop - we'll see how well he can match it.

Monday, September 1, 2014

'77 Door Panel with '78 Sport Mirrors and Remote

Wow.  The second door panel is now installed.  This was a bit different, since it wasn't designed for the bullet mirrors and the "remote" mechanism - I had to install it before the door panel was installed.  Here's what I did.

First, I had to mark where the remote connection would be coming through the door panel.  For this, I installed the door panel at the top, and swung it down to put a mark on the black plastic on the back of the door panel.  Then, using that mark, I drilled a vertical hole through the panel.  The problem was that the remote adapter goes through the panel at an angle.  I drilled a second hole through the panel at an angle.

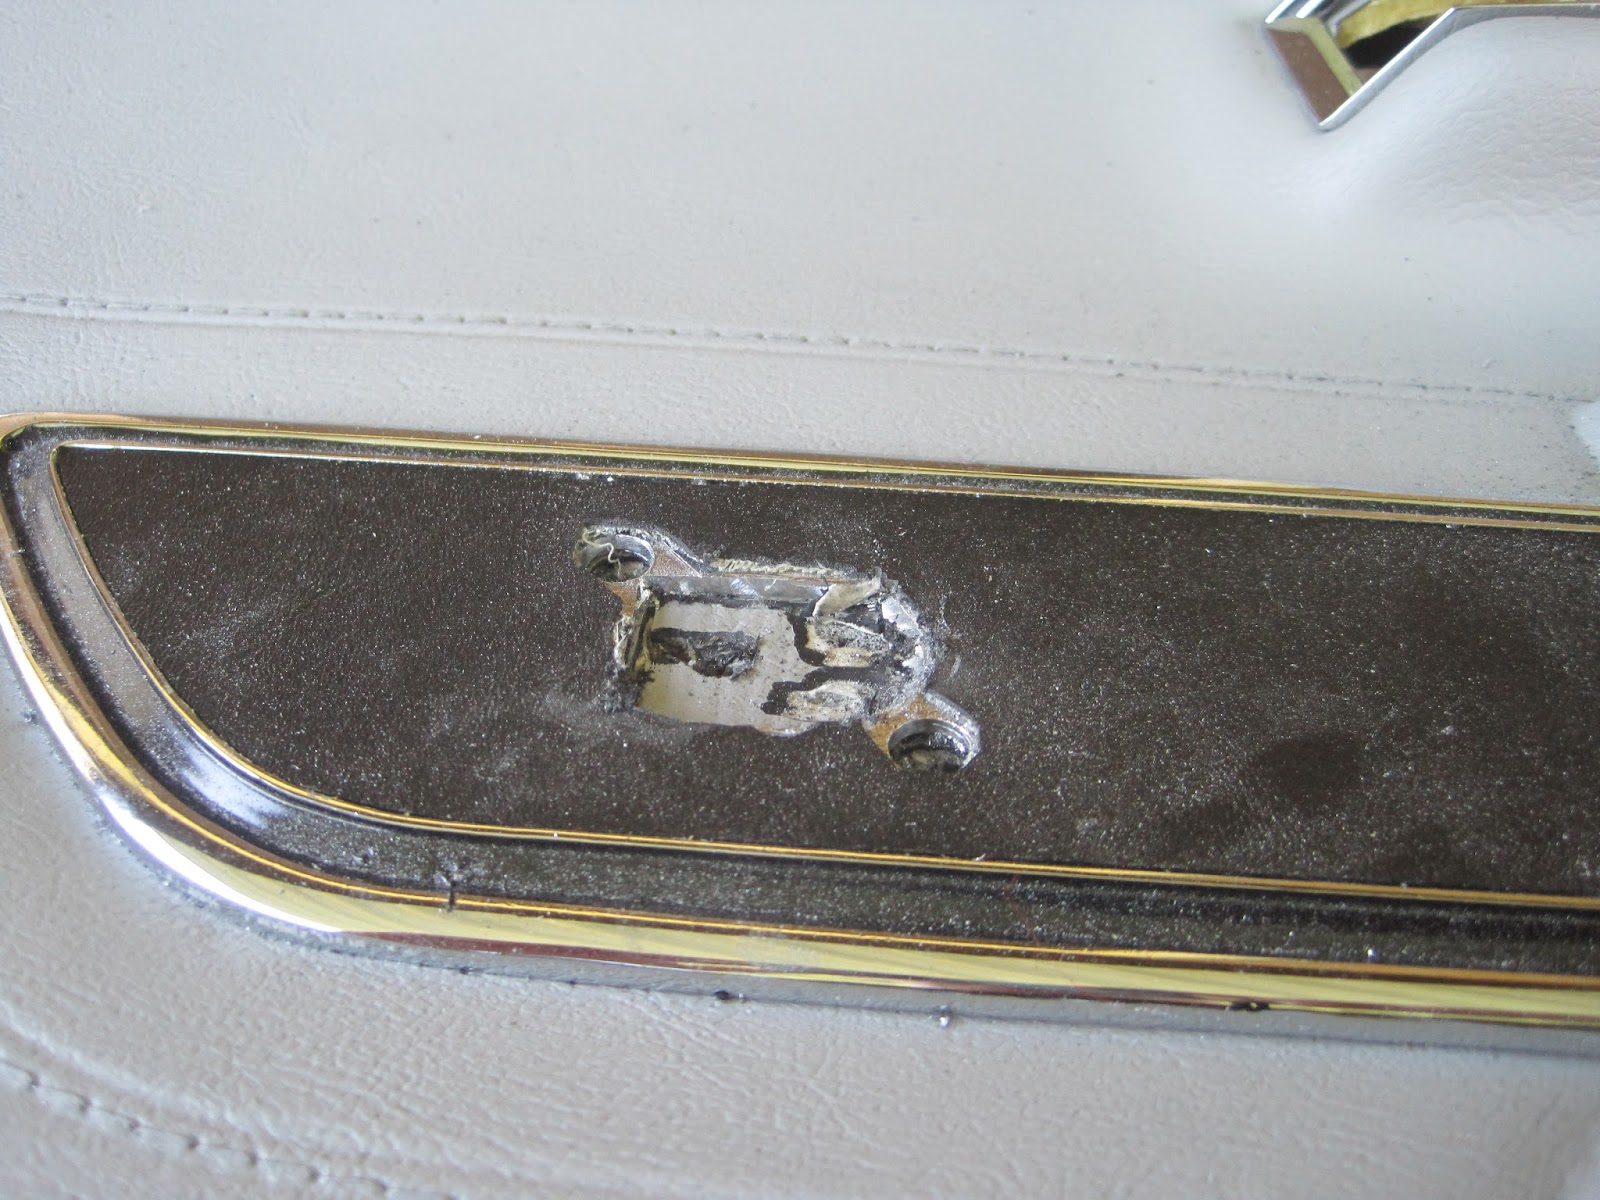
With the approximate location of where things had to be cut, I grabbed my Dremel, and (using the back side of the chrome trim for the remote as a template) started cutting the approximate location:


Once through the trim metal, I found that the "vinyl" for the door underneath.  I used the Dremel again to cut through that, and found black plastic underneath that, too.  Beneath that was the foam, and then the back side of the panel, which was black plastic.  Cutting it out :


I then used the Dremel again to cut around and expand the "square" cut that was a template, making it very much an oval (which is what the chrome trim piece looks like).  Once I was close, I placed the trim piece in position and used an awl through it to mark where the two holes to hold it in place would go.  Then, I drilled them out :


With the trim piece in place, I started to look like it really belonged there :


I had a few minutes to install the door panel :


Looks like it was made that way!

Saturday, August 30, 2014

"AfterGlass" - One Door Panel and One Dash Panel

Finally,  some visual progress! After adjusting the door glass, I was finally able to start installing some interior again... and got some work done on the right side. I did run into a few issues, though. First, even though the dash pad and the dash panel were made by the same company,  and purchased at the same time (7 years ago), they didn't match up so well. I had to redrill holes in the lower left pad and used finishing washers to prevent the screws from going through the vinyl all the way. Looks a little odd,  and maybe it's supposed to be done that way, I don't know -I've never seen the dash installed. Nor the door panels.

But, here I am having the right panels installed. Happy for me!


Wednesday, August 20, 2014

CentOS 7, Pidgin, and OTR

I recently upgraded to CentOS 7 for my desktop (probably a mistake, but that's what I do). I ran into a problem - I couldn't find the OTR plugin. I checked the EPEL repos - and I couldn't find what I needed. I could find the pidgin-otr-debuginfo RPM, but not the straight pidgin-otr plugin. Hrrrm. I need the plugin, so here's how I got it. http://rpm.pbone.net/ is a great little resource for finding packages from other distributions, so I ran out there and grabbed the libotr, libotr-devel, and pidgin-devel packages for RedHat EL7. I needed a couple of other packages that are available in the standard CentOS repository to give me the requisites, so fired off the following :
    yum install libpurple-devel.x86_64 libgcrypt-devel.x86_64 gtk2-devel.x86_64
I then installed the pilfered RPM's grabbed through rpm.pbone.net :
    rpm -ivh libotr-4.0.0-4.el7.x86_64.rpm libotr-devel-4.0.0-4.el7.x86_64.rpm pidgin-devel-2.10.9-1.el7.x86_64.rpm
Once I had the basics down, I needed to grab the source code for the plugin. I grabbed this from https://otr.cypherpunks.ca/ (the "OTR plugin for Pidgin" download). I extracted it, and ran through the normal compilations :
    tar -xzf pidgin-otr-4.0.0.tar.gz
    cd pidgin-otr-4.0.0/
    ./configure
    make
    
Then as root :
    make install
    
However, upon restarting pidgin and checking "Tools" -> "Plugins", I couldn't see the "Off-The-Record" plugin showing up. I reviewed the results of the make install, and found it installed to /usr/local/lib/pidgin/. So, I copied the files in place :
    cp /usr/local/lib/pidgin/pidgin-otr.* /lib64/pidgin/
I restarted pidgin again to get it to pick up the changes, and viola!

Saturday, August 16, 2014

Corvette Door Glass Finally Adjusted

Amazing what you can do when you aren't plagued by tree removal, then stump removal, then hole digging (by hand, not by auger or even shovel), and then fence building.  We finished our fence last week (but couldn't do much as we had a holiday up in northern Idaho around the Wallace/Osburn area), and that project freed up quite a bit of stress and "can't do because of a fence" demotivation.

So, with the fence out of the way, I was finally able to finish probing the electrical.  I knew I had to replace the power window regulator, which I had already ordered.  A screw and two plugs later (this is why the dash isn't installed - it was really easy to get to it without any panels), I connected the battery and pulled the door glass out (it was sitting there on top of the railings, and would have shattered if left in while working switches).  Once out, I checked the motors - the drivers' side was perfect.  I re-installed the glass, getting it into the right position, and everything came to a grinding halt when I realized....

... the painter from years ago and introduced a problem I had worked around, and the glass didn't fit evenly with his newly installed door panel.  [sigh].  I again made more adjustments, and pulled out the window felt strips I had adjusted earlier.  I made added adjustments, and reinstalled them, then reinstalled the window again, only to pull it back apart and made more adjustments to the window felt.  A couple of times doing this, I called it as good a compromise as I could get, and reinstalled the window glass once last time.  I ran some adjustments (luckily I have the AIM manual that had instructions, though I do know the Factory Service Manual has better instructions).

I had to redo the windshield chrome trim on the passengers' side - but once that was out of the way, the window was adjusted in 5 minutes.

So, it's time to start putting the interior together.  I run out and grab the door panels I've had squirreled away before I sent the car to the paint shop, about 6 years old - never installed to the car.  I never thought of things like this - I figured they'd be nice and stable.  Not so - they WARPED and don't fit:


Considering I'd love this car to be perfect, I was curious to see what it would cost to replace them.  Curiousity kills the car (not the cat) so I load up Ecklers to check prices.... $440/side.  There's no way I can mentally accept an $880 payment when we're trying to save for an adoption.  It's unacceptable.  So, the next step is to put the door panels on the back porch for a while with some weights on them to see if I can straighten them out.  That will be a HUGE step toward finishing the interior off.  I'll get there, though.  A little at a time.

Monday, July 28, 2014

SSH Security - Stopping Server Scanners

I have to maintain my SSH connection to the home network for various reasons.  Because of that, my SSH connection is open to the world - and I'm a paranoid.  So, what do I do to maintain my sanity?  Most Linux distributions include a handy little program called "swatch".  It's a "simple watcher" application that uses regular expressions (hooray for Perl people!) and acts when something is "found".

Here's an example.  Let's say you opened up your log file and see a number of these :
    
    Apr 12 09:36:23 servername sshd[11307]: User root from 61.174.49.113 not allowed because not listed in AllowUsers
    Apr 12 09:36:23 servername sshd[11310]: input_userauth_request: invalid user root
    Apr 12 09:36:23 servername unix_chkpwd[11316]: password check failed for user (root)
    Apr 12 09:36:23 servername sshd[11306]: pam_unix(sshd:auth): authentication failure; logname= uid=0 euid=0 tty=ssh ruser= rhost=61.174.49.113  user=root
    Apr 12 09:36:23 servername sshd[11308]: reverse mapping checking getaddrinfo for 113.49.174.61.dial.wz.zj.dynamic.163data.com.cn [61.174.49.113] failed - POSSIBLE BREAK-IN ATTEMPT!
    Apr 12 09:36:23 server name sshd[11308]: User root from 61.174.49.113 not allowed because not listed in AllowUsers
    
For anyone NOT security minded, here are a couple of quick points :
  • You know immediately that someone is scanning your server, trying to find an open account that is easily compromised.
  • You ALSO know that their attack fills up your network pipe - and communication is vital.
So, what do you do?  We simply watch the logs, and then trigger adding a route to the loop back interface.  This causes us to suddenly become "unresponsive" to whomever is doing the scan.  If, after a minute, they continue to scan, we simply block for a little longer each time, ultimately just making it semi-permanent.  So, here's how.

We create an rc file containing our instructions.  Create a configuration file in /etc (say, /etc/swatchrc), and add the following :
    # Bad authentication attempts from ssh
    watchfor   /Failed password for/
            exec "/usr/local/bin/failed_password.sh $1 $2 $3 $4 $5 $6 $7 $8 $9 $10 $11 $12 $13 $14 $15"
    
This simply looks for the regular expression /Failed password for/ in /var/log/secure, and then runs a script of ours, /usr/local/bin/failed_password.sh.  This script consists of simple rules :
    #!/bin/bash
    
    ATTEMPTS_LIMIT=4
    NOTIFICATIONS_TO='email@address.com'
    
    # get the IP address :
    IP=`echo $* | sed 's/^.* from //' | awk '{print $1}' | sed 's/::ffff://'`
    
    # get the number of attempts from this IP :
    ATTEMPTS=`grep $IP /var/log/secure | grep "Failed password for"  | wc -l`
    
    if [ $ATTEMPTS -gt $ATTEMPTS_LIMIT ]; then
    
     # black list the IP by sending it to the loop back interface
     route add $IP lo
    
     # in the calculated number of minutes, un black list the IP
     # but, make this somewhat exponential
     ATTEMPTPOVER=`expr $ATTEMPTS - $ATTEMPTS_LIMIT`
     let MINUTES=$ATTEMPTPOVER*3
     echo "route del $IP lo 2> /dev/null" | at now +$MINUTES minutes 2>&1 > /tmp/.bad_user.$$
    
     # since we get a lot of people from China and Europe scanning
     # us, let's only send a notification if we hit a count of 5, or more than 20 attempts
    
     # first, five attempts
     if [ $ATTEMPTS -eq 5 ]; then
      # now let's send a notification for good measure
      (hostname ; echo $* ; echo "IP=$IP" ; echo "ATTEMPTS=$ATTEMPTS" ; \
       echo "Blocking for $MINUTES minutes" ; \
       cat /tmp/.bad_user.$$ ) | Mail -s "Scan Running From $IP" $NOTIFICATIONS_TO
     fi
     # next, 20 or more - and, let's simply iptables them until the next reboot
     if [ $ATTEMPTS -gt 19 ]; then
      /sbin/iptables -I INPUT 4 -s $IP -j REJECT
      # now let's send a notification for good measure
      (hostname ; echo $* ; echo "IP=$IP" ; echo "ATTEMPTS=$ATTEMPTS" ; \
       echo "Blocking for $MINUTES minutes" ; \
       cat /tmp/.bad_user.$$ ) | Mail -s "Permanently Blocking $IP" $NOTIFICATIONS_TO
     fi
    
     # also, ensure we log that we are blocking, and for how long
     /bin/logger -p authpriv.warn "Saw auth attempt $ATTEMPTS from $IP - blocking for $MINUTES minutes"
    fi
    
    # clean up after ourselves
    rm -f /tmp/.bad_user.$$
    
The script is explained by comments, but here's the gist. Ths script is executed every time /var/log/secure matches a "Failed password for" along with the full log line (including the IP address). It then "greps" for that IP in /var/log/secure and grabs a total of the failed attempts. If that number of events is greater than ATTEMPTS_LIMIT (4), we route anything to that IP through loopback and schedule a job to delete that route $MINUTES out (calculated as the number of attempts over the ATTEMPTS_LIMIT multiplied by 3). Then, if we have 5 attempts - it's a script that someone is letting run, so we send a single notification. If we get to 20 attempts (the last one is nearly an hour of being blocked before it can try again), we send a new notification that we've blocked the IP, and we run an iptables command to insert it into our firewall (the block should disappear on the next host reboot). So, that's how it works.

Next, we have to start swatch up :
    /usr/bin/swatch --config-file=/etc/swatchrc --tail-file=/var/log/secure \
     --awk-field-syntax --tail-args "-F" &
Also, make sure you add it to your /etc/rc.local in order to automatically start it up on boot (e.g. in case of a power outage).